Our software update is now concluded. You will need to reset your password to log in. In order to do this, you will have to click "Log in" in the top right corner and then "Forgot your password?".
Welcome to PokéCommunity! Register now and join one of the best fan communities on the 'net to talk Pokémon and more! We are not affiliated with The Pokémon Company or Nintendo.
Hey, can I please be a player character please? Maybe as an optional boss or as a pokemon that joins the team only if they can defeat me in battle please.
This game is played via voting and you can join the voting. The votes are at the bottom of my weekly update posts.
For additional information I'd recommend to read the opening post.
EDIT:
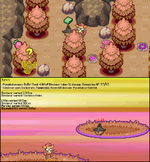
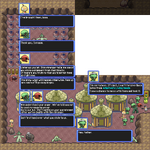
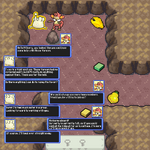
Not enough room for all attachments of the next prompt in the post below, so I'm editing and attaching the fight images here =3
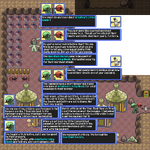
1) Simipour is in the lead. Do we want to swap our lead for this room?
A) No, keep Simipour in the lead.
B) Yes, switch to Alolan Persian.
C) Yes, switch to Litleo.
D) Yes, switch to Barboach. - 1 vote
E) Yes, switch to Simisear. - 1 vote
F) Yes, switch to Squawkabilly.
Tied. Had to look up Barboach and Pawniard's stats to see who's faster. They have the same speed, but Barboach has a minus speed nature and both Pawniard are higher leveled. We should be able to kill the Pawniard in two hits with Bulldoze, and if we get the Speed drop they'll be slower on the second turn. That is if we get the speed drop. They might also not have Defiant.
The level 25 Pawniard has Assurance which is a bit scary if combined with a Speed Drop and Defiant, but it would need to live 2 hits to make use of that, which I don't think it will. Plus it might not even go for it.
It's a bit riskier, but I'll join D), as I kinda want to clear this room so we can come back for the egg at any point later on without having to fight anything and I don't think Simisear will live through 3 Silicobras.
2) How do we fight any enemies in this room?
A) Offensively; nothing but attacking moves and prioritizes super-effective attacks if possible. - 2 votes
B) Balanced; Uses both Attacking moves as well as non-attacking moves. Prioritizes super-effective attacks if possible. Uses attacking moves 66% of the time on average.
C) Defensively. Only attacks once every 3 turns. Uses the other two turns for non-attacking moves.
3-1) We have a Blowback Orb. Do we use the Blowback Orb in this room?
A) Yes, use a Blowback Orb on the level 24 Pawniard.
B) Yes, use a Blowback Orb on the level 25 Pawniard.
C) Yes, use a Blowback Orb on the level 23 Silicobra.
D) Yes, use a Blowback Orb on the level 22 Silicobra.
E) Yes, use a Blowback Orb on the level 24 Silicobra.
F) No, don't use a Blowback Orb now. - 2 votes
3-2) A See-Trap Orb reveals all traps in the current room and the lead Pokemon will avoid stepping on them if possible. Do we use a See-Trap Orb in this room?
A) Yes, use a See-Trap Orb.
B) No, don't use a See-Trap Orb now. - 2 votes
3-3) The Trapbust Orb destroys all traps in the current room. Do we use the Trapbust Orb in this room?
A) Yes, use the Trapbust Orb.
B) No, don't use the Trapbust Orb now. - 2 votes
3-4) A Slumber Orb puts an enemy to sleep so we can pass it without fighting it or start the fight with it asleep. Do we use a Slumber Orb in this room?
A) Yes, use a Slumber Orb on the level 24 Pawniard and avoid fighting it.
B) Yes, use a Slumber Orb on the level 24 Pawniard and start a fight with it being asleep.
C) Yes, use a Slumber Orb on the level 25 Pawniard and avoid fighting it.
D) Yes, use a Slumber Orb on the level 25 Pawniard and start a fight with it being asleep.
E) Yes, use a Slumber Orb on the level 23 Silicobra and avoid fighting it.
F) Yes, use a Slumber Orb on the level 23 Silicobra and start a fight with it being asleep.
G) Yes, use a Slumber Orb on the level 22 Silicobra and avoid fighting it.
H) Yes, use a Slumber Orb on the level 22 Silicobra and start a fight with it being asleep.
I) Yes, use a Slumber Orb on the level 24 Silicobra and avoid fighting it.
J) Yes, use a Slumber Orb on the level 24 Silicobra and start a fight with it being asleep.
K) No, don't use a Slumber Orb now. - 2 votes
3-5) A Slumber Orb puts an enemy to sleep so we can pass it without fighting it or start the fight with it asleep. Do we use a second Slumber Orb in this room?
A) Yes, use a Slumber Orb on the level 24 Pawniard and avoid fighting it.
B) Yes, use a Slumber Orb on the level 24 Pawniard and start a fight with it being asleep.
C) Yes, use a Slumber Orb on the level 25 Pawniard and avoid fighting it.
D) Yes, use a Slumber Orb on the level 25 Pawniard and start a fight with it being asleep.
E) Yes, use a Slumber Orb on the level 23 Silicobra and avoid fighting it.
F) Yes, use a Slumber Orb on the level 23 Silicobra and start a fight with it being asleep.
G) Yes, use a Slumber Orb on the level 22 Silicobra and avoid fighting it.
H) Yes, use a Slumber Orb on the level 22 Silicobra and start a fight with it being asleep.
I) Yes, use a Slumber Orb on the level 24 Silicobra and avoid fighting it.
J) Yes, use a Slumber Orb on the level 24 Silicobra and start a fight with it being asleep.
K) No, don't use a Slumber Orb now. - 2 votes
3-6) We have a Lob Orb. Do we use the Lob Orb in this room?
A) Yes, use a Lob Orb on the level 24 Pawniard.
B) Yes, use a Lob Orb on the level 25 Pawniard.
C) Yes, use a Lob Orb on the level 23 Silicobra.
D) Yes, use a Lob Orb on the level 22 Silicobra.
E) Yes, use a Lob Orb on the level 24 Silicobra.
F) No, don't use a Lob Orb now. - 2 votes
4) We can heal after defeating 2 opponents. Should we heal?
A) Yes, drink a Berry Juice. Heals up to 50 HP and also heals any status conditions.
B) Yes, eat an Oran Berry. Heals up to 100 HP. - 1 vote
C) Yes, eat a Sitrus Berry. Heals up to 250 HP.
D) No, don't heal up. - 1 vote
Tied. We will probably take quite a bit of damage in the Pawniard fights. I'll join B)
5) What do we do with the items in this room?
A) Pick up all items. - 1 vote
B) Pick up only the items that don't result in fighting the Silicobra. - 1 vote
C) Pick up only the Brushoff Orb.
D) Pick up only the Dragon Fang.
E) Pick up only the Green Shards.
F) Pick up only the Red Shards.
G) Pick up only the Yellow Shards.
H) Pick up only the Oran Berry.
I) Pick up the Green Shards and the Yellow Shards.
J) Pick up the Green Shards and the Red Shards.
K) Pick up the Green Shards and the Oran Berry.
L) Pick up the Green Shards and the Brushoff Orb.
M) Pick up the Green Shards and the Dragon Fang.
N) Pick up the Yellow Shards and the Red Shards.
O) Pick up the Yellow Shards and the Oran Berry
P) Pick up the Yellow Shards and the Brushoff Orb.
Q) Pick up the Yellow Shards and the Dragon Fang.
R) Pick up the Red Shards and the Oran Berry.
S) Pick up the Red Shards and the Brushoff Orb.
T) Pick up the Red Shards and the Dragon Fang.
U) Pick up the Oran Berry and the Brushoff Orb.
V) Pick up the Oran Berry and the Dragon Fang.
W) Pick up the Brushoff Orb and the Dragon Fang.
X) Pick up the Brushoff Orb, the Oran Berry and the Dragon Fang.
Y) Pick up the Brushoff Orb, the Oran Berry and the Red Shards.
Z) Pick up the Brushoff Orb, the Oran Berry and the Yellow Shards
Tied. Might as well join A)
6) Which room do we go to next?
A) Go to room 1 from it's right Southern entry.
B) Go to room 1 from it's left Southern entry.
C) Go to room 2 from it's Southern entry.
D) Go to room 2 from it's Eastern entry.
E) Go to room 4 from it's upper Western entry.
F) Go to room 4 from it's Northern entry.
G) Go to room 4 from it's lower Western entry.
H) Go to room 3 from it's Western entry. (we'll have to fight the Nymble on the way).
I) Go to room 3 from its left Southern entry.
J) Go to room 3 from it's right Southern entry.
K) Go to room 6 from it's Western entry.
L) Go to room 6 from it's Eastern entry.
M) Go to room 6 from it's Southern entry.
N) Go to the Large Forest room to fight the remaining enemies and pick up the remaining items.
O) Go to room 8.
P) Go to room 7 from the Western entrance.
Q) Go to room 7 from the Northern entrance.
R) Go to room 9.
S) Go to room 10 from the Eastern entrance.
T) Go to room 10 from the Southern entrance.
U) Go to room 11 from the Northern entrance.
V) Go to room 11 from the Eastern entrance.
W) Go to room 11 from the Southern entrance.
X) Go to room 13.
Y) Go to room 14.
Z) Go to room 15 from the upper Eastern entrance. - 2 votes
?) Go to room 15 from the lower Eastern entrance.
!) Go to the Move Releaner/Egg Move Tutor in the tree stump room.
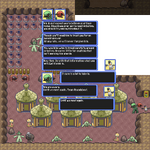
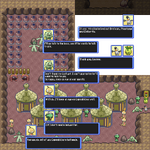
We switch the lead to Barboach and we fight any enemies in this room offensively.
We don't use any Orbs in this room and heal by eating an Oran Berry after defeating 2 opponents.
We pick up all items and we go to room 15 from the upper Eastern entrance.
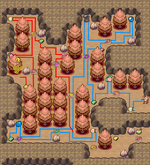
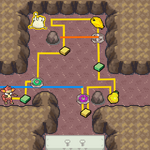
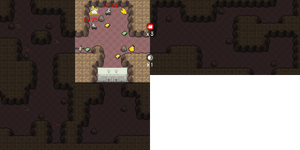
The path we take is as follows:
Stepped on a Sticky Trap. A Yellow Shard became sticky.
Stepped on a Trip Trap. Barboach tripped and dropped it's Soft Sand. The Soft Sand has been added back to the inventory.
Stepped on a PP Leech Trap. Water Gun lost all of it's PP.
Stepped on a Spiky Trap. Barboach took 25 damage.
Alolan Persian takes over and sees the Mud Trap & Blast Trap and ignores them.
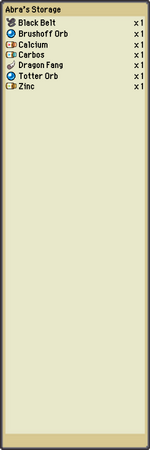
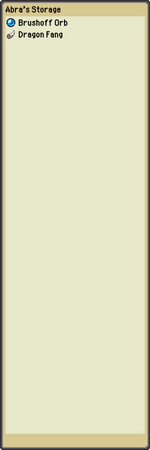
Our 'Other Items' pocket is full so the Brushoff Orb and Dragon Fang have been sent to Abra Storage, which we can now access the next time there is a Hot Spring vote.
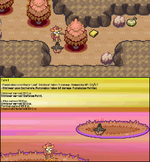
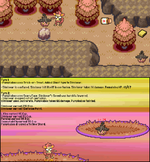
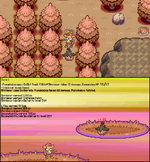
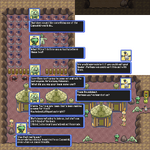
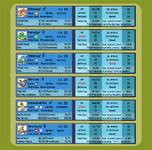
The fights:
Spoiler:
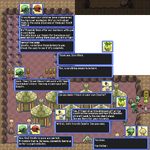
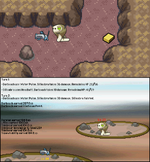
Pawniard, level 25:
Pawniard, level 24:
Silicobra, level 23:
Silicobra, level 22:
Silicobra, level 24:
Text in case the images are hard to read:
Spoiler:
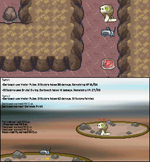
---Pawniard, level 25---
Barboach enters the fight at 57/57 HP.
Pawniard outspeeds.
Hopefully Bulbapedia is correct on how Torment works... I don't really use the move myself lol.
"Torment prevents the target from using the same move twice in a row. The effect lasts until the target is switched out. If a Pokémon has selected the move it used last turn and becomes affected with Torment, it may still use the move this turn (even if it moves after the user of Torment)."
Barboach leveled up to level 24! Simipour leveled up to level 25!
Barboach fainted and left the team. (I'm pretty salty about rolling that Spiky Trap. Barboach would've lived the fight with the 3rd Silicobra just barely with 2 HP had it been a non-damaging trap. And judging from the path; Barboach wouldn't have stepped on the Blast Trap further on D= )
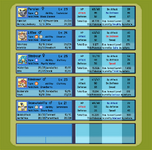
Team Roundabout:
Spoiler:
Effort Values.
Effort Values Earned, Litleo:
2 HP Points
1 Sp. Attack Point
1 Sp. Defense Point
33 Speed Points
Effort Values Earned, Persian:
4 HP Points
1 Defense Point
3 Sp. Attack Points
2 Speed Points
Apparently I never removed the Fire Stone from our inventory after we used it for Simisear. Fixed that.
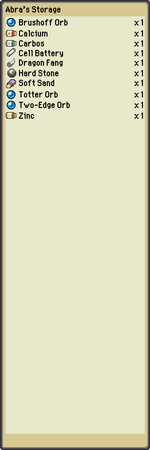
Abra Storage (Item Storage for full inventory sections):
Spoiler:
Quests:
Spoiler:
Main Quest:
-Escape the Dungeon.
Side Quests:
-Halted Negotiations
Objective: Find the third Smoliv running an errand to the Construction Company.
Reward: 2 Blue Shards, a Sitrus Berry and a Lob Orb. + 40 Faction Reputation for Arboliva's Living Needs and Exp based on the lead's level when turning in the quest.
Optional Path: Help Smoliv confront the Scovillain Society and retrieve the stolen shipment.
Optional Path Reward: Trailblaze TM, 2 Yellow Shards and 2 Blue shards and Smoliv becomes recruitable if we complete the optional path before reporting in to his brother.
-The Lost Shipment
Objective: Find out if the food shipment was really stolen or not and retrieve it if so.
Reward: Dig TM and a Brushoff Orb. + 25 Team Reputation and Exp based on the lead's level when turning in the quest.
Faction Quests:
-
Completed Quests:
Spoiler:
1) The Lost Hairpin (Side Quest)
Objective: Find Chikorita's hairpin. It's somewhere along the route she described.
Reward: 3 Green Shards, 2 Yellow Shards and a Blowback Orb. + 20 Team Reputation and Exp based on the lead's level when turning in the quest.
2) Left Behind (Side Quest)
Objective: Escort Smoliv back to the merchant stand.
Reward: 2 Yellow Shards, 2 Green Shards, 1 Blue Shard & 1 Trapbust Orb + 30 Faction Reputation for Arboliva's Living Needs and Exp based on the lead's level when turning in the quest.
3) Merchant Guard Recruitment
Objective: Seek out any of the three candidates mentioned by Torterra and get them to hear you out.
Reward: 1 Blue Shard + 2 Yellow Shards + 1 Carbos, 1 Calcium & 1 Protein. + 50 Team Reputation and Exp based on the lead's level when turning in the quest.
Bonus Objective Completed: Get all of the candidates to hear you out before making a decision on which guard to send to Torterra.
Additional Reward Unlocked: 1 Carbos, 1 Calcium & 1 Protein + 1 See-Trap Orb
Failed or Refused Quests:
-Spider Trouble (Refused)
Objective: Defeat a group of Spinarak led by an Ariados for Chespin.
Reputation:
Spoiler:
Team Roundabout's Reputation:
135 Rep
Spoiler:
+30 Team Reputation for helping Roserade save her Budew from the Grimer. (Act 1 - Chapter 12 )
+20 Team Reputation for helping Breloom find his Shroomish. (Act 1 - Chapter 17)
+20 Team Reputation for completing the 'The Lost Hairpin' Side Quest (Act 1 - Chapter 19)
+15 Team Reputation for helping Lilligant deal with the Squawkabilly (Act 1 - Chapter 24)
+50 Team Reputation for completing the Merchant Guard Recruitment quest (Act 1 - Chapter 30)
Faction Reputation:
-Arboliva's Living Needs:
50 Rep - Merchant trade inventory has expanded!
Spoiler:
+20 Faction Reputation for helping the Smoliv beat the Capsakid in a fight. (Act 1 - Chapter 2)
+30 Faction Reputation for completing the 'Left Behind' Side Quest (Act 1 - Chapter 19)
-Scovillain Society:
0 Rep
Spoiler:
No Faction Reputation earned.
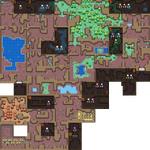
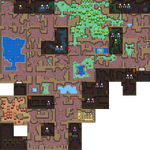
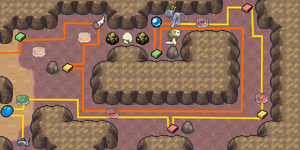
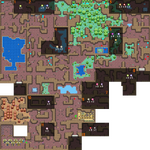
Dungeon Map:
Spoiler:
The green dot is where we are currently. Cyan dots are items we didn't pick up. Red dots are optional enemies we didn't fight.
The Green X marks the location of the construction company where the third Smoliv is supposed to be.
The Cyan X marks the location of the Scovillain Society's camp.
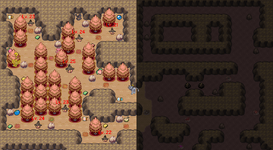
Pokemon Dungeon Escape - Act 1 - Chapter 38
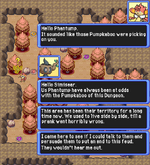
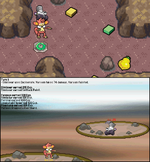
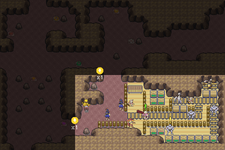
We arrive at the room that was marked with a 15 on the map, from the upper entrance.
The Pumpkaboo will attack us if we get within 5 tiles of them.
The Pumpkaboo are searching for a Phantump that they consider to have intruded on their territory.
Spoiler:
1) Alolan Persian is in the lead. Do we want to swap our lead for this room?
A) No, keep Alolan Persian in the lead.
B) Yes, switch to Litleo.
C) Yes, switch to Simipour.
D) Yes, switch to Simisear.
E) Yes, switch to Squawkabilly.
2-1) How do we fight any enemies in this room?
A) Offensively; nothing but attacking moves and prioritizes super-effective attacks if possible.
B) Balanced; Uses both Attacking moves as well as non-attacking moves. Prioritizes super-effective attacks if possible. Uses attacking moves 66% of the time on average.
C) Defensively. Only attacks once every 3 turns. Uses the other two turns for non-attacking moves.
2-2) The Pumpkaboo will only attack if we get within 5 tiles of them, so we don't have to fight all of them. Phantump can only be recruited if we defeat all of them, however. Do we fight all the Pumpkaboo?
A) Yes, fight all of the Pumpkaboo.
B) No, only fight enough Pumpkaboo to clear Phantump a path out of the room.
C) No, fight only the Pumpkaboo that cross our path based on other votes.
3-1) We have a Blowback Orb. Do we use the Blowback Orb in this room?
A) Yes, use a Blowback Orb on the level 25 Super Size Pumpkaboo.
B) Yes, use a Blowback Orb on the upper level 24 Large Size Pumpkaboo.
C) Yes, use a Blowback Orb on the level 23 Large Size Pumpkaboo.
D) Yes, use a Blowback Orb on the lower level 24 Large Size Pumpkaboo.
E) Yes, use a Blowback Orb on the level 21 Average Size Pumpkaboo.
F) Yes, use a Blowback Orb on the level 23 Average Size Pumpkaboo.
G) Yes, use a Blowback Orb on the level 22 Average Size Pumpkaboo.
H) No, don't use a Blowback Orb now.
3-2) A See-Trap Orb reveals all traps in the current room and the lead Pokemon will avoid stepping on them if possible. Do we use a See-Trap Orb in this room?
A) Yes, use a See-Trap Orb.
B) No, don't use a See-Trap Orb now.
3-3) The Trapbust Orb destroys all traps in the current room. Do we use the Trapbust Orb in this room?
A) Yes, use the Trapbust Orb.
B) No, don't use the Trapbust Orb now.
3-4) A Slumber Orb puts an enemy to sleep so we can pass it without fighting it or start the fight with it asleep. Do we use a Slumber Orb in this room?
A) Yes, use a Slumber Orb on the level 25 Super Size Pumpkaboo and avoid fighting it.
B) Yes, use a Slumber Orb on the level 25 Super Size Pumpkaboo, and start a fight with it being asleep.
C) Yes, use a Slumber Orb on the upper level 24 Large Size Pumpkaboo and avoid fighting it.
D) Yes, use a Slumber Orb on the upper level 24 Large Size Pumpkaboo and start a fight with it being asleep.
E) Yes, use a Slumber Orb on the level 23 Large Size Pumpkaboo and avoid fighting it.
F) Yes, use a Slumber Orb on the level 23 Large Size Pumpkaboo and start a fight with it being asleep.
G) Yes, use a Slumber Orb on the lower level 24 Large Size Pumpkaboo and avoid fighting it.
H) Yes, use a Slumber Orb on the lower level 24 Large Size Pumpkaboo and start a fight with it being asleep.
I) Yes, use a Slumber Orb on the level 21 Average Size Pumpkaboo and avoid fighting it.
J) Yes, use a Slumber Orb on the level 21 Average Size Pumpkaboo and start a fight with it being asleep.
K) Yes, use a Slumber Orb on the level 23 Average Size Pumpkaboo and avoid fighting it.
L) Yes, use a Slumber Orb on the level 23 Average Size Pumpkaboo and start a fight with it being asleep.
M) Yes, use a Slumber Orb on the level 22 Average Size Pumpkaboo and avoid fighting it.
N) Yes, use a Slumber Orb on the level 22 Average Size Pumpkaboo and start a fight with it being asleep.
O) No, don't use a Slumber Orb now.
3-5) A Slumber Orb puts an enemy to sleep so we can pass it without fighting it or start the fight with it asleep. Do we use a second Slumber Orb in this room?
A) Yes, use a Slumber Orb on the level 25 Super Size Pumpkaboo and avoid fighting it.
B) Yes, use a Slumber Orb on the level 25 Super Size Pumpkaboo, and start a fight with it being asleep.
C) Yes, use a Slumber Orb on the upper level 24 Large Size Pumpkaboo and avoid fighting it.
D) Yes, use a Slumber Orb on the upper level 24 Large Size Pumpkaboo and start a fight with it being asleep.
E) Yes, use a Slumber Orb on the level 23 Large Size Pumpkaboo and avoid fighting it.
F) Yes, use a Slumber Orb on the level 23 Large Size Pumpkaboo and start a fight with it being asleep.
G) Yes, use a Slumber Orb on the lower level 24 Large Size Pumpkaboo and avoid fighting it.
H) Yes, use a Slumber Orb on the lower level 24 Large Size Pumpkaboo and start a fight with it being asleep.
I) Yes, use a Slumber Orb on the level 21 Average Size Pumpkaboo and avoid fighting it.
J) Yes, use a Slumber Orb on the level 21 Average Size Pumpkaboo and start a fight with it being asleep.
K) Yes, use a Slumber Orb on the level 23 Average Size Pumpkaboo and avoid fighting it.
L) Yes, use a Slumber Orb on the level 23 Average Size Pumpkaboo and start a fight with it being asleep.
M) Yes, use a Slumber Orb on the level 22 Average Size Pumpkaboo and avoid fighting it.
N) Yes, use a Slumber Orb on the level 22 Average Size Pumpkaboo and start a fight with it being asleep.
O) No, don't use a Slumber Orb now.
3-6) We have a Lob Orb. Do we use the Lob Orb in this room?
A) Yes, use a Lob Orb on the level 25 Super Size Pumpkaboo.
B) Yes, use a Lob Orb on the upper level 24 Large Size Pumpkaboo.
C) Yes, use a Lob Orb on the level 23 Large Size Pumpkaboo.
D) Yes, use a Lob Orb on the lower level 24 Large Size Pumpkaboo.
E) Yes, use a Lob Orb on the level 21 Average Size Pumpkaboo.
F) Yes, use a Lob Orb on the level 23 Average Size Pumpkaboo.
G) Yes, use a Lob Orb on the level 22 Average Size Pumpkaboo.
H) No, don't use a Lob Orb now.
3-7) We have a Two-Edge Orb, which Halves the HP of all foes in the room as well as the Party Leader. This Orb can only be used in rooms with 6 or more enemies. Do we use the Two-Edge Orb in this room?
A) Yes, use the Two-Edge Orb straight away.
B) Yes, use it after fighting the first opponent.
C) Yes, use it after fighting the second opponent.
D) Yes, use it after fighting the third opponent.
E) Yes, use it after fighting the fourth opponent.
F) Yes, use it after fighting the fifth opponent.
G) Yes, use it after fighting the sixth opponent.
H) No, don't ue the Two-Edge Orb now.
Took me a while to settle on how to actually implement this Orb tbh.
4-1) We can heal after defeating 2 opponents. Should we heal?
A) Yes, drink a Berry Juice. Heals up to 50 HP and also heals any status conditions.
B) Yes, eat an Oran Berry. Heals up to 100 HP.
C) Yes, eat a Sitrus Berry. Heals up to 250 HP.
D) No, don't heal up.
4-2) We can heal after defeating 5 opponents. Should we heal?
A) Yes, drink a Berry Juice. Heals up to 50 HP and also heals any status conditions.
B) Yes, eat an Oran Berry. Heals up to 100 HP.
C) Yes, eat a Sitrus Berry. Heals up to 250 HP.
D) No, don't heal up.
5-1) We can assist the Phantump. We can help it escape by beating enough Pumpkaboo to clear a path. Doing so will earn us 20 Team Reputation. Defeating all the Pumpkaboo and helping Phantump escape will earn us 30 Team Reputation. Should we help the Phantump?
A) Yes, help the Phantump by clearing a path.
B) Yes, help the Phantump by defeating all of the Pumpkaboo.
C) No, don't help the Phantump and only fight the Pumpkaboo we come across while navigating the room.
5-2)If we defeat all of the Pumpkaboo, Phantump will be willing to join us and can be recruited. If we defeated all the Pumpkaboo, do we recruit the Phantump?
A) Yes, recruit the Phantump after defeating all of the Pumpkaboo.
B) No, don't recruit the Phantump.
6) What do we do with the items in this room?
A) Pick up all items.
B) Pick up only the items that are within 5 tiles along the path we take based on the other votes.
C) Pick up only the Totter Orb.
D) Pick up only the Black Belt.
E) Pick up only the Zinc.
F) Pick up only the Green Shards.
G) Pick up only the Red Shard.
H) Pick up only the Persim Berry.
I) Pick up only the Max Mushroom.
J) Pick up only the Pecha Berry.
K) Pick up only the Yellow Shards.
L) Pick up only the Carbos.
M) Pick up only the Oran Berry.
N) Pick up only the Calcium.
O) Pick up only the Berry Juice.
P) Pick up the Totter Orb and Black Belt.
Q) Pick up the Totter Orb and Zinc.
R) Pick up the Totter Orb and Green Shards.
S) Pick up the Totter Orb and Red Shard.
T) Pick up the Totter Orb and Persim Berry.
U) Pick up the Totter Orb and Max Mushroom.
V) Pick up the Totter Orb and Pecha Berry.
W) Pick up the Totter Orb and Yellow Shards.
X) Pick up the Totter Orb and Carbos.
Y) Pick up the Totter Orb and Oran Berry.
Z) Pick up the Totter Orb and Calcium.
Max Mushrooms can be used on Pokemon that have a Gigantamax form. This permanently unlocks that Pokemon's ability to Gigantamax.
Once consumed by that Pokemon they can assume their Gigantamax form for any one fight, per room, for the full fight regardless of how many turns it takes.
I'm using both Megas and Gigantamax forms in this game. Megas work similarly, except for the Mega stone being a held item and not a consumable.
7) Which room do we go to next?
A) Go to room 1 from it's right Southern entry.
B) Go to room 1 from it's left Southern entry.
C) Go to room 2 from it's Southern entry.
D) Go to room 2 from it's Eastern entry.
E) Go to room 4 from it's upper Western entry.
F) Go to room 4 from it's Northern entry.
G) Go to room 4 from it's lower Western entry.
H) Go to room 3 from it's Western entry. (we'll have to fight the Nymble on the way).
I) Go to room 3 from its left Southern entry.
J) Go to room 3 from it's right Southern entry.
K) Go to room 6 from it's Western entry.
L) Go to room 6 from it's Eastern entry.
M) Go to room 6 from it's Southern entry.
N) Go to the Large Forest room to fight the remaining enemies and pick up the remaining items.
O) Go to room 8.
P) Go to room 7 from the Western entrance.
Q) Go to room 7 from the Northern entrance.
R) Go to room 9.
S) Go to room 10 from the Eastern entrance.
T) Go to room 10 from the Southern entrance.
U) Go to room 11 from the Northern entrance.
V) Go to room 11 from the Eastern entrance.
W) Go to room 11 from the Southern entrance.
X) Go to room 13.
Y) Go to room 14.
Z) Go to the Move Releaner/Egg Move Tutor in the tree stump room.
Correct on Torment. Rarely sees it also. Mainly remembers Totem Salazzle (in Sun/Moon) having it.
Yeesh on those Spike Traps. Compare it to a Super Fang doing 36 damage on full health Simipour. Smacks you for nearly that much (at any health) without a way to reasonably react.
1) E) Yes, switch to Squawkabilly. Initially chose Simisear. Why not catch Squawkabilly up a little? Handles the (physical) Grass attacks well.
2-1) A) Offensively; nothing but attacking moves and prioritizes super-effective attacks if possible. As usual.
2-2) A) Yes, fight all of the Pumpkaboo. Should provide the necessary team reputation for that other room.
3-1) H) No, don't use a Blowback Orb now. Nothing dangerous here.
3-2) B) No, don't use a See-Trap Orb now. Because...
3-3) A) Yes, use the Trapbust Orb. Exists for rooms like these.
3-4) O) No, don't use a Slumber Orb now. No big problems here. Should be easy wins.
3-5) O) No, don't use a Slumber Orb now.
3-6) H) No, don't use a Lob Orb now.
3-7) H) No, don't ue the Two-Edge Orb now. Interesting. Definitely wants an Oran Berry on the party leader for this orb.
4-1) B) Yes, eat an Oran Berry. Heals up to 100 HP. Just a bit of safety. Not particularly needed on Simisear, though. Already holds an Oran Berry.
4-2) B) Yes, eat an Oran Berry. Heals up to 100 HP. Necessary? Probably not. Guards against crits and 5-hit Bullet Seeds. Bought a bunch for a reason, though.
5-1) B) Yes, help the Phantump by defeating all of the Pumpkaboo. Better experience this way.
5-2) A) Yes, recruit the Phantump after defeating all of the Pumpkaboo. More party members always.
6) A) Pick up all items. Should be safe with no traps. And oh hey, the Black Belt.
7) Y) Go to room 14. Acquired enough team reputation for the better option.
Considers Squawkabilly safe still. Brings Intimidate and a resistance for all of Pumpkaboo's attacks (Bullet Seed, Razor Leaf). Two-shots any Pumpkaboo (at minimum). Hits only a hair weaker than Simisear's Incinerate and slightly more than Alolan Persian's Bite. Avoids Balanced attacking as a general rule because of potentially doing things double Yawning or Torment...at all. Ends the fight before most of those matter too, resulting in more damage taken.
1) Alolan Persian is in the lead. Do we want to swap our lead for this room?
A) No, keep Alolan Persian in the lead. - 1 vote
B) Yes, switch to Litleo.
C) Yes, switch to Simipour.
D) Yes, switch to Simisear. - 1 vote
E) Yes, switch to Squawkabilly. - 1 vote
Tied. Well looks like we won't be using the Trapbust Orb, which has me gravitate towards Alolan Persian as there's a Poison Trap, Spin Trap and Blast Trap and a bunch of other annoying traps. Can Alolan Persian one hit all the Pumpkaboo however? It's close to a level up, so I kinda feel like as long as it knocks out the Super Size Pumpkaboo we should be fine. Alolan Persian isn't going to like a potential 5 hit Bullet Seed if the Super Size Pumpkaboo lives a hit though.
Simisear is probably going to one hit the Pumpkaboos and still resists their attacks even if it doesn't. Squawkabilly would lower their Attack one stage. Simisear is holding a berry however and is higher leveled. I think Simisear has more survivability between these two.
Looks like I have to choose between picking Alolan Persian which would take more damage in fights if it doesn't one shot, but which would avoid all the traps, or Simisear, which would very likely one shot, but is greatly hindered by all the traps.
Between the berry it's holding and the two heal votes, I think Simisear would be the safer play? :unsure:
I'll join D).
2-1) How do we fight any enemies in this room?
A) Offensively; nothing but attacking moves and prioritizes super-effective attacks if possible. - 2 votes
B) Balanced; Uses both Attacking moves as well as non-attacking moves. Prioritizes super-effective attacks if possible. Uses attacking moves 66% of the time on average. - 1 vote
C) Defensively. Only attacks once every 3 turns. Uses the other two turns for non-attacking moves.
2-2) The Pumpkaboo will only attack if we get within 5 tiles of them, so we don't have to fight all of them. Phantump can only be recruited if we defeat all of them, however. Do we fight all the Pumpkaboo?
A) Yes, fight all of the Pumpkaboo. - 3 votes
B) No, only fight enough Pumpkaboo to clear Phantump a path out of the room.
C) No, fight only the Pumpkaboo that cross our path based on other votes.
3-1) We have a Blowback Orb. Do we use the Blowback Orb in this room?
A) Yes, use a Blowback Orb on the level 25 Super Size Pumpkaboo.
B) Yes, use a Blowback Orb on the upper level 24 Large Size Pumpkaboo.
C) Yes, use a Blowback Orb on the level 23 Large Size Pumpkaboo.
D) Yes, use a Blowback Orb on the lower level 24 Large Size Pumpkaboo.
E) Yes, use a Blowback Orb on the level 21 Average Size Pumpkaboo.
F) Yes, use a Blowback Orb on the level 23 Average Size Pumpkaboo.
G) Yes, use a Blowback Orb on the level 22 Average Size Pumpkaboo.
H) No, don't use a Blowback Orb now. - 3 votes
3-2) A See-Trap Orb reveals all traps in the current room and the lead Pokemon will avoid stepping on them if possible. Do we use a See-Trap Orb in this room?
A) Yes, use a See-Trap Orb.
B) No, don't use a See-Trap Orb now. - 3 votes
3-3) The Trapbust Orb destroys all traps in the current room. Do we use the Trapbust Orb in this room?
A) Yes, use the Trapbust Orb. - 1 vote
B) No, don't use the Trapbust Orb now. - 2 votes
3-4) A Slumber Orb puts an enemy to sleep so we can pass it without fighting it or start the fight with it asleep. Do we use a Slumber Orb in this room?
A) Yes, use a Slumber Orb on the level 25 Super Size Pumpkaboo and avoid fighting it.
B) Yes, use a Slumber Orb on the level 25 Super Size Pumpkaboo, and start a fight with it being asleep.
C) Yes, use a Slumber Orb on the upper level 24 Large Size Pumpkaboo and avoid fighting it.
D) Yes, use a Slumber Orb on the upper level 24 Large Size Pumpkaboo and start a fight with it being asleep.
E) Yes, use a Slumber Orb on the level 23 Large Size Pumpkaboo and avoid fighting it.
F) Yes, use a Slumber Orb on the level 23 Large Size Pumpkaboo and start a fight with it being asleep.
G) Yes, use a Slumber Orb on the lower level 24 Large Size Pumpkaboo and avoid fighting it.
H) Yes, use a Slumber Orb on the lower level 24 Large Size Pumpkaboo and start a fight with it being asleep.
I) Yes, use a Slumber Orb on the level 21 Average Size Pumpkaboo and avoid fighting it.
J) Yes, use a Slumber Orb on the level 21 Average Size Pumpkaboo and start a fight with it being asleep.
K) Yes, use a Slumber Orb on the level 23 Average Size Pumpkaboo and avoid fighting it.
L) Yes, use a Slumber Orb on the level 23 Average Size Pumpkaboo and start a fight with it being asleep.
M) Yes, use a Slumber Orb on the level 22 Average Size Pumpkaboo and avoid fighting it.
N) Yes, use a Slumber Orb on the level 22 Average Size Pumpkaboo and start a fight with it being asleep.
O) No, don't use a Slumber Orb now. - 3 votes
3-5) A Slumber Orb puts an enemy to sleep so we can pass it without fighting it or start the fight with it asleep. Do we use a second Slumber Orb in this room?
A) Yes, use a Slumber Orb on the level 25 Super Size Pumpkaboo and avoid fighting it.
B) Yes, use a Slumber Orb on the level 25 Super Size Pumpkaboo, and start a fight with it being asleep.
C) Yes, use a Slumber Orb on the upper level 24 Large Size Pumpkaboo and avoid fighting it.
D) Yes, use a Slumber Orb on the upper level 24 Large Size Pumpkaboo and start a fight with it being asleep.
E) Yes, use a Slumber Orb on the level 23 Large Size Pumpkaboo and avoid fighting it.
F) Yes, use a Slumber Orb on the level 23 Large Size Pumpkaboo and start a fight with it being asleep.
G) Yes, use a Slumber Orb on the lower level 24 Large Size Pumpkaboo and avoid fighting it.
H) Yes, use a Slumber Orb on the lower level 24 Large Size Pumpkaboo and start a fight with it being asleep.
I) Yes, use a Slumber Orb on the level 21 Average Size Pumpkaboo and avoid fighting it.
J) Yes, use a Slumber Orb on the level 21 Average Size Pumpkaboo and start a fight with it being asleep.
K) Yes, use a Slumber Orb on the level 23 Average Size Pumpkaboo and avoid fighting it.
L) Yes, use a Slumber Orb on the level 23 Average Size Pumpkaboo and start a fight with it being asleep.
M) Yes, use a Slumber Orb on the level 22 Average Size Pumpkaboo and avoid fighting it.
N) Yes, use a Slumber Orb on the level 22 Average Size Pumpkaboo and start a fight with it being asleep.
O) No, don't use a Slumber Orb now. - 3 votes
3-6) We have a Lob Orb. Do we use the Lob Orb in this room?
A) Yes, use a Lob Orb on the level 25 Super Size Pumpkaboo.
B) Yes, use a Lob Orb on the upper level 24 Large Size Pumpkaboo.
C) Yes, use a Lob Orb on the level 23 Large Size Pumpkaboo.
D) Yes, use a Lob Orb on the lower level 24 Large Size Pumpkaboo.
E) Yes, use a Lob Orb on the level 21 Average Size Pumpkaboo.
F) Yes, use a Lob Orb on the level 23 Average Size Pumpkaboo.
G) Yes, use a Lob Orb on the level 22 Average Size Pumpkaboo.
H) No, don't use a Lob Orb now. - 3 votes
3-7) We have a Two-Edge Orb, which Halves the HP of all foes in the room as well as the Party Leader. This Orb can only be used in rooms with 6 or more enemies. Do we use the Two-Edge Orb in this room?
A) Yes, use the Two-Edge Orb straight away.
B) Yes, use it after fighting the first opponent.
C) Yes, use it after fighting the second opponent.
D) Yes, use it after fighting the third opponent.
E) Yes, use it after fighting the fourth opponent.
F) Yes, use it after fighting the fifth opponent.
G) Yes, use it after fighting the sixth opponent.
H) No, don't ue the Two-Edge Orb now. - 3 votes
4-1) We can heal after defeating 2 opponents. Should we heal?
A) Yes, drink a Berry Juice. Heals up to 50 HP and also heals any status conditions. - 1 vote
B) Yes, eat an Oran Berry. Heals up to 100 HP. - 1 vote
C) Yes, eat a Sitrus Berry. Heals up to 250 HP.
D) No, don't heal up. - 1 vote
Tied. There's a damage trap and a Poison trap to deal damage to us. I'd join the Berry Juice if the Poison trap were earlier, but from the looks of it, it isn't. With Simisear in the lead, if we can prevent Gluttony from activating the Oran Berry it's holding as long as possible it might not even end up needing the one it's holding.
I'll join B).
4-2) We can heal after defeating 5 opponents. Should we heal?
A) Yes, drink a Berry Juice. Heals up to 50 HP and also heals any status conditions.
B) Yes, eat an Oran Berry. Heals up to 100 HP. - 3 votes
C) Yes, eat a Sitrus Berry. Heals up to 250 HP.
D) No, don't heal up.
5-1) We can assist the Phantump. We can help it escape by beating enough Pumpkaboo to clear a path. Doing so will earn us 20 Team Reputation. Defeating all the Pumpkaboo and helping Phantump escape will earn us 30 Team Reputation. Should we help the Phantump?
A) Yes, help the Phantump by clearing a path.
B) Yes, help the Phantump by defeating all of the Pumpkaboo. - 3 votes
C) No, don't help the Phantump and only fight the Pumpkaboo we come across while navigating the room.
5-2)If we defeat all of the Pumpkaboo, Phantump will be willing to join us and can be recruited. If we defeated all the Pumpkaboo, do we recruit the Phantump?
A) Yes, recruit the Phantump after defeating all of the Pumpkaboo. - 3 votes
B) No, don't recruit the Phantump.
6) What do we do with the items in this room?
A) Pick up all items. - 3 votes
B) Pick up only the items that are within 5 tiles along the path we take based on the other votes.
C) Pick up only the Totter Orb.
D) Pick up only the Black Belt.
E) Pick up only the Zinc.
F) Pick up only the Green Shards.
G) Pick up only the Red Shard.
H) Pick up only the Persim Berry.
I) Pick up only the Max Mushroom.
J) Pick up only the Pecha Berry.
K) Pick up only the Yellow Shards.
L) Pick up only the Carbos.
M) Pick up only the Oran Berry.
N) Pick up only the Calcium.
O) Pick up only the Berry Juice.
P) Pick up the Totter Orb and Black Belt.
Q) Pick up the Totter Orb and Zinc.
R) Pick up the Totter Orb and Green Shards.
S) Pick up the Totter Orb and Red Shard.
T) Pick up the Totter Orb and Persim Berry.
U) Pick up the Totter Orb and Max Mushroom.
V) Pick up the Totter Orb and Pecha Berry.
W) Pick up the Totter Orb and Yellow Shards.
X) Pick up the Totter Orb and Carbos.
Y) Pick up the Totter Orb and Oran Berry.
Z) Pick up the Totter Orb and Calcium.
7) Which room do we go to next?
A) Go to room 1 from it's right Southern entry.
B) Go to room 1 from it's left Southern entry.
C) Go to room 2 from it's Southern entry.
D) Go to room 2 from it's Eastern entry.
E) Go to room 4 from it's upper Western entry.
F) Go to room 4 from it's Northern entry.
G) Go to room 4 from it's lower Western entry.
H) Go to room 3 from it's Western entry. (we'll have to fight the Nymble on the way).
I) Go to room 3 from its left Southern entry.
J) Go to room 3 from it's right Southern entry.
K) Go to room 6 from it's Western entry.
L) Go to room 6 from it's Eastern entry.
M) Go to room 6 from it's Southern entry.
N) Go to the Large Forest room to fight the remaining enemies and pick up the remaining items.
O) Go to room 8.
P) Go to room 7 from the Western entrance. - 1 vote
Q) Go to room 7 from the Northern entrance.
R) Go to room 9.
S) Go to room 10 from the Eastern entrance.
T) Go to room 10 from the Southern entrance.
U) Go to room 11 from the Northern entrance.
V) Go to room 11 from the Eastern entrance.
W) Go to room 11 from the Southern entrance.
X) Go to room 13.
Y) Go to room 14. - 2 votes
Z) Go to the Move Releaner/Egg Move Tutor in the tree stump room.
Correct on Torment. Rarely sees it also. Mainly remembers Totem Salazzle (in Sun/Moon) having it.
Yeesh on those Spike Traps. Compare it to a Super Fang doing 36 damage on full health Simipour. Smacks you for nearly that much (at any health) without a way to reasonably react.
1) E) Yes, switch to Squawkabilly. Initially chose Simisear. Why not catch Squawkabilly up a little? Handles the (physical) Grass attacks well.
2-1) A) Offensively; nothing but attacking moves and prioritizes super-effective attacks if possible. As usual.
2-2) A) Yes, fight all of the Pumpkaboo. Should provide the necessary team reputation for that other room.
3-1) H) No, don't use a Blowback Orb now. Nothing dangerous here.
3-2) B) No, don't use a See-Trap Orb now. Because...
3-3) A) Yes, use the Trapbust Orb. Exists for rooms like these.
3-4) O) No, don't use a Slumber Orb now. No big problems here. Should be easy wins.
3-5) O) No, don't use a Slumber Orb now.
3-6) H) No, don't use a Lob Orb now.
3-7) H) No, don't ue the Two-Edge Orb now. Interesting. Definitely wants an Oran Berry on the party leader for this orb.
4-1) B) Yes, eat an Oran Berry. Heals up to 100 HP. Just a bit of safety. Not particularly needed on Simisear, though. Already holds an Oran Berry.
4-2) B) Yes, eat an Oran Berry. Heals up to 100 HP. Necessary? Probably not. Guards against crits and 5-hit Bullet Seeds. Bought a bunch for a reason, though.
5-1) B) Yes, help the Phantump by defeating all of the Pumpkaboo. Better experience this way.
5-2) A) Yes, recruit the Phantump after defeating all of the Pumpkaboo. More party members always.
6) A) Pick up all items. Should be safe with no traps. And oh hey, the Black Belt.
7) Y) Go to room 14. Acquired enough team reputation for the better option.
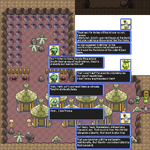
We switch the lead to Simisear. We fight any enemies in this room offensively and we fight all the Pumpkaboo.
We don't use any orbs in this room. We eat an Oran Berry after defeating 2 opponents and after defeating 5 opponents.
We help the Phantump by defeating all of the Pumpkaboo and then recruit it.
We pick up all items and go to the room marked with 14 on the map next.
The path we take is as follows:
Stepped on a Blast Trap. Simisear takes 17 damage.
Stepped on a Grimy Trap. An Aspear Berry went bad and was tossed out.
Stepped on a Slow Trap. Simisear's Speed fell drastically (3 stages)
Stepped on a Spin Trap. Simisear is now confused.
Stepped on a Sticky Trap. The TwistedSpoon became sticky and can't be equipped until it's cleansed.
Stepped on a Grimy Trap. A Rawst Berry went bad and was tossed out.
Stepped on a Poison Trap. Simisear was poisoned.
Stepped on a Mud Trap. Simisear's Attack harshly fell.
Stepped on a PP Leech Trap. Simisear's Acrobatics lost all of it's PP.
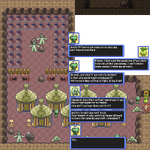
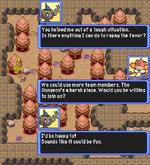
The Dialogue with Phantump:
Spoiler:
The path we take after talking to Phantump is as follows:
Stepped on a Mud Trap. Simisear's Defense harshly fell.
Stepped on a Seal Trap. Simisear's Incinerate was sealed.
Items we do not have room for have been sent to Abra Storage.
The fights:
Spoiler:
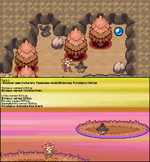
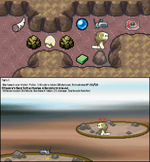
Pumpkaboo, Super Size, level 25:
Pumpkaboo, Large Size, level 24:
Pumpkaboo, Average Size, level 21:
Pumpkaboo, Large Size, level 23:
Pumpkaboo, Large Size, level 24:
Pumpkaboo, Average Size, level 22:
Pumpkaboo, Average Size, level 23:
Text in case the images are hard to read:
Spoiler:
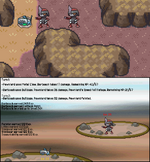
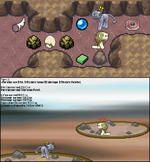
---Pumpkaboo, Super Size, level 25---
Simisear enters the fight at 50/67 HP.
Simisear outspeeds.
Simisear earned 221 Exp.
Simisear earned 1 Defense Point.
Simisear has leveled up to level 24!
Litleo earned 111 Exp.
Simipour earned 111 Exp.
Persian earned 111 Exp.
Squawkabilly earned 111 Exp.
Squawkabilly has leveled up to level 22!
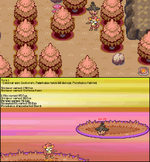
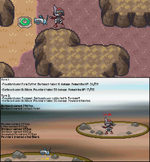
---Pumpkaboo, Large Size, level 24---
Simisear enters the fight at 55/67 HP.
Pumpkaboo outspeeds.
Turn 1:
-Pumpkaboo uses Trick-or-Treat. Added Ghost type to Simisear.
-Simisear is confused. Simisear hit itself in confusion. Simisear takes 14 damage. Remaining HP: 41/67
Turn 2:
-Pumpkaboo uses Scary Face. Simisear's Speed was harshly lowered.
-Simisear snapped out of confusion.
Simisear uses Incinerate. Pumpkaboo takes 66 damage. Pumpkaboo fainted.
Stat changes, Simisear:
-2 Attack
-2 Defense
-5 Speed
The Hideout (Recruited Pokemon not in Party):
Spoiler:
Currently Empty.
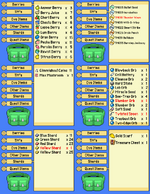
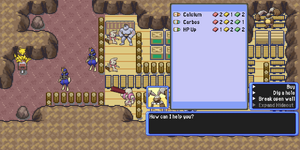
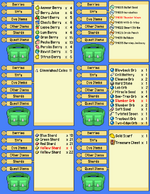
Inventory:
Spoiler:
Abra Storage (Item Storage for full inventory sections):
Spoiler:
Quests:
Spoiler:
Main Quest:
-Escape the Dungeon.
Side Quests:
-Halted Negotiations
Objective: Find the third Smoliv running an errand to the Construction Company.
Reward: 2 Blue Shards, a Sitrus Berry and a Lob Orb. + 40 Faction Reputation for Arboliva's Living Needs and Exp based on the lead's level when turning in the quest.
Optional Path: Help Smoliv confront the Scovillain Society and retrieve the stolen shipment.
Optional Path Reward: Trailblaze TM, 2 Yellow Shards and 2 Blue shards and Smoliv becomes recruitable if we complete the optional path before reporting in to his brother.
-The Lost Shipment
Objective: Find out if the food shipment was really stolen or not and retrieve it if so.
Reward: Dig TM and a Brushoff Orb. + 25 Team Reputation and Exp based on the lead's level when turning in the quest.
Faction Quests:
-
Completed Quests:
Spoiler:
1) The Lost Hairpin (Side Quest)
Objective: Find Chikorita's hairpin. It's somewhere along the route she described.
Reward: 3 Green Shards, 2 Yellow Shards and a Blowback Orb. + 20 Team Reputation and Exp based on the lead's level when turning in the quest.
2) Left Behind (Side Quest)
Objective: Escort Smoliv back to the merchant stand.
Reward: 2 Yellow Shards, 2 Green Shards, 1 Blue Shard & 1 Trapbust Orb + 30 Faction Reputation for Arboliva's Living Needs and Exp based on the lead's level when turning in the quest.
3) Merchant Guard Recruitment
Objective: Seek out any of the three candidates mentioned by Torterra and get them to hear you out.
Reward: 1 Blue Shard + 2 Yellow Shards + 1 Carbos, 1 Calcium & 1 Protein. + 50 Team Reputation and Exp based on the lead's level when turning in the quest.
Bonus Objective Completed: Get all of the candidates to hear you out before making a decision on which guard to send to Torterra.
Additional Reward Unlocked: 1 Carbos, 1 Calcium & 1 Protein + 1 See-Trap Orb
Failed or Refused Quests:
-Spider Trouble (Refused)
Objective: Defeat a group of Spinarak led by an Ariados for Chespin.
Reputation:
Spoiler:
Team Roundabout's Reputation:
165 Rep
Spoiler:
+30 Team Reputation for helping Roserade save her Budew from the Grimer. (Act 1 - Chapter 12 )
+20 Team Reputation for helping Breloom find his Shroomish. (Act 1 - Chapter 17)
+20 Team Reputation for completing the 'The Lost Hairpin' Side Quest (Act 1 - Chapter 19)
+15 Team Reputation for helping Lilligant deal with the Squawkabilly (Act 1 - Chapter 24)
+50 Team Reputation for completing the Merchant Guard Recruitment quest (Act 1 - Chapter 30)
+30 Team Reputation for defeating all the Pumpkaboo and helping Phantump escape (Act 1 - Chapter 38)
Faction Reputation:
-Arboliva's Living Needs:
50 Rep - Merchant trade inventory has expanded!
Spoiler:
+20 Faction Reputation for helping the Smoliv beat the Capsakid in a fight. (Act 1 - Chapter 2)
+30 Faction Reputation for completing the 'Left Behind' Side Quest (Act 1 - Chapter 19)
-Scovillain Society:
0 Rep
Spoiler:
No Faction Reputation earned.
Dungeon Map:
Spoiler:
The green dot is where we are currently. Cyan dots are items we didn't pick up. Red dots are optional enemies we didn't fight.
The Green X marks the location of the construction company where the third Smoliv is supposed to be.
The Cyan X marks the location of the Scovillain Society's camp.
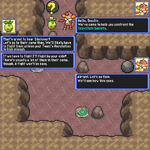
We arrive at the room that was marked with a 14 on the map.
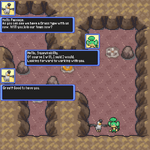
The Capsakid and Cacnea respond to Smoliv's arrival in this room:
Spoiler:
1-1) We've recruited Phantump. Phantump's stats are according to a neutral nature, pending what nature we vote for it. Which of the following natures does our newly recruited Phantump have?
A) Quiet (+Sp. Attack, -Speed)
B) Bold (+Defense, -Attack)
C) Docile (Neutral nature)
D) Impish (+Defense, -Sp. Attack)
1-2) Have Phantump hold an item?
A) Yes, have Phantump hold the Cell Battery.
B) Yes, have Phantump hold the Hard Stone.
C) Yes, have Phantump hold the Miracle Seed.
D) Yes, have Phantump hold the Soft Sand.
E) Yes, have Phantump hold an Oran Berry.
F) Yes, have Phantump hold a Sitrus Berry.
G) Yes, have Phantump hold a Lum Berry.
H) Yes, have Phantump hold a Berry Juice.
I) No, don't have Phantump hold any items now.
1-3) Phantump can learn Bulldoze via TM. Teach Phantump Bulldoze?
A) Yes, forget Confuse Ray.
B) Yes, forget Will-O-Wisp.
C) Yes, forget Hex.
D) Yes, forget Growth.
E) No, don't learn Bulldoze
2) Simisear is at 1/70 HP and Poisoned. Do we heal and/or treat the Poison?
A) Yes, drink a Berry Juice. Heals up to 50 HP and also heals any status conditions.
B) Yes, eat an Oran Berry. Heals up to 100 HP.
C) Yes, eat a Sitrus Berry. Heals up to 250 HP.
D) Yes, eat a Pecha Berry to cure the Poison.
E) Yes, eat a Pecha Berry to cure the Poison and an Oran Berry to heal up.
F) Yes, eat a Pecha Berry to cure the Poison and a Sitrus Berry to heal up.
G) Yes, eat a Lum Berry to cure the Poison.
H) Yes, eat a Lum Berry to cure the Poison and an Oran Berry to heal up.
I) Yes, eat a Lum Berry to cure the Poison and a Sitrus Berry to heal up.
J) No, don't heal up.
Wasn't sure whether or not to have Gluttony trigger the held Oran Berry outside of a fight during the last room.
Wouldn't have mattered though. Had to pass through multiple rooms to get back here. Would've just ended up using the Oran Berry and still being at 1 HP by the time we get here.
Decided to have held Berries only trigger outside of a fight if there's a damaging trap coming up, or in the case of status berries, if we just stepped on a trap that gives a status that can be healed by it.
3) Simisear is in the lead. Do we want to swap our lead for this room?
A) No, keep Simisear in the lead.
B) Yes, switch to Litleo.
C) Yes, switch to Simipour.
D) Yes, switch to Alolan Persian.
E) Yes, switch to Squawkabilly.
F) Yes, switch to Phantump.
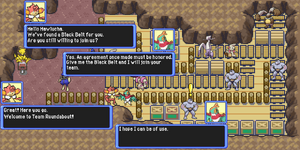
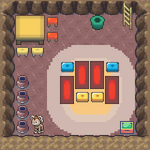
4)The Pokemon here belong to the Scovillain Society. They are not outright hostile to us, but if we pick a fight with them or are goaded into one they will all band together to defeat us. How do we deal with the Scovillain Society in this room?
A) Let Smoliv try to convince them to hand over the stolen shipment and only interfere if a fight starts (-10 Scovillain Society Reputation).
B) Pick a fight with the Scovillain Society and take back the stolen shipment by force (-50 Scovillain Society Reputation).
C) Resolve the situation peacefully by taking over the negotiations (Requires a Team Reputation of 150 or higher; Requirement has been met).
D) Tell Smoliv to retreat and come back later.
E) Ditch Smoliv and leave it to it's fate (-30 Arboliva's Living Needs Reputation).
Negative reputation with a faction will result in their members attacking us on sight, and they will not be willing to help us should we ever need their help. If the negative reputation goes low enough (-100 or more), they will dispatch hunting parties into the Dungeon to hunt us down.
5) If we end up fighting, how do we fight any enemies in this room?
A) Offensively; nothing but attacking moves and prioritizes super-effective attacks if possible.
B) Balanced; Uses both Attacking moves as well as non-attacking moves. Prioritizes super-effective attacks if possible. Uses attacking moves 66% of the time on average.
C) Defensively. Only attacks once every 3 turns. Uses the other two turns for non-attacking moves.
6-1) We have a Blowback Orb. Do we use the Blowback Orb in this room?
A) Yes, use a Blowback Orb on the Cacnea in front of us.
B) Yes, use a Blowback Orb on the second closest Cacnea.
C) Yes, use a Blowback Orb on the third closest Cacnea.
D) Yes, use a Blowback Orb on the furthest Cacnea.
E) Yes, use a Blowback Orb on the Capsakid in front of us.
F) Yes, use a Blowback Orb on the second closest Capsakid.
G) Yes, use a Blowback Orb on the third closest Capsakid.
H) Yes, use a Blowback Orb on the furthest Capsakid.
I) Yes, use a blowback Orb on the nearest Scraggy.
J) Yes, use a Blowback Orb on the second closest Scraggy.
K) Yes, use a Blowback Orb on the third closest Scraggy.
L) Yes, use a Blowback Orb on the furthest Scraggy.
M) No, don't use a Blowback Orb now.
6-2) A Slumber Orb puts an enemy to sleep so we can pass it without fighting it or start the fight with it asleep. Do we use a Slumber Orb in this room?
A) Yes, use a Slumber Orb on the Cacnea in front of us and avoid fighting it.
B) Yes, use a Slumber Orb on the Cacnea in front of us and start a fight with it being asleep.
C) Yes, use a Slumber Orb on the second closest Cacnea and avoid fighting it.
D) Yes, use a Slumber Orb on the second closest Cacnea and start a fight with it being asleep.
E) Yes, use a Slumber Orb on the third closest Cacnea and avoid fighting it.
F) Yes, use a Slumber Orb on the third closest Cacnea and start a fight with it being asleep.
G) Yes, use a Slumber Orb on the furthest Cacnea and avoid fighting it.
H) Yes, use a Slumber Orb on the furthest Cacnea and start a fight with it being asleep.
I) Yes, use a Slumber Orb on the Capsakid in front of us and avoid fighting it.
J) Yes, use a Slumber Orb on the Capsakid in front of us and start a fight with it being asleep.
K) Yes, use a Slumber Orb on the second closest Capsakid and avoid fighting it.
L) Yes, use a Slumber Orb on the second closest Capsakid and start a fight with it being asleep.
M) Yes, use a Slumber Orb on the third closest Capsakid and avoid fighting it.
N) Yes, use a Slumber Orb on the third closest Capsakid and start a fight with it being asleep.
O) Yes, use a Slumber Orb on the furthest Capsakid and avoid fighting it.
P) Yes, use a Slumber Orb on the furthest Capsakid and start a fight with it being asleep.
Q) Yes, use a Slumber Orb on the nearest Scraggy and avoid fighting it.
R) Yes, use a Slumber Orb on the nearest Scraggy and start a fight with it being asleep.
S) Yes, use a Slumber Orb on the second closest Scraggy and avoid fighting it.
T) Yes, use a Slumber Orb on the second closest Scraggy and start a fight with it being asleep.
U) Yes, use a Slumber Orb on the third closest Scraggy and avoid fighting it.
V) Yes, use a Slumber Orb on the third closest Scraggy and start a fight with it being asleep.
W) Yes, use a Slumber Orb on the furthest Scraggy and avoid fighting it.
X) Yes, use a Slumber Orb on the furthest Scraggy and start a fight with it being asleep.
Y) No, don't use a Slumber Orb now.
6-3) A Slumber Orb puts an enemy to sleep so we can pass it without fighting it or start the fight with it asleep. Do we use a second Slumber Orb in this room?
A) Yes, use a Slumber Orb on the Cacnea in front of us and avoid fighting it.
B) Yes, use a Slumber Orb on the Cacnea in front of us and start a fight with it being asleep.
C) Yes, use a Slumber Orb on the second closest Cacnea and avoid fighting it.
D) Yes, use a Slumber Orb on the second closest Cacnea and start a fight with it being asleep.
E) Yes, use a Slumber Orb on the third closest Cacnea and avoid fighting it.
F) Yes, use a Slumber Orb on the third closest Cacnea and start a fight with it being asleep.
G) Yes, use a Slumber Orb on the furthest Cacnea and avoid fighting it.
H) Yes, use a Slumber Orb on the furthest Cacnea and start a fight with it being asleep.
I) Yes, use a Slumber Orb on the Capsakid in front of us and avoid fighting it.
J) Yes, use a Slumber Orb on the Capsakid in front of us and start a fight with it being asleep.
K) Yes, use a Slumber Orb on the second closest Capsakid and avoid fighting it.
L) Yes, use a Slumber Orb on the second closest Capsakid and start a fight with it being asleep.
M) Yes, use a Slumber Orb on the third closest Capsakid and avoid fighting it.
N) Yes, use a Slumber Orb on the third closest Capsakid and start a fight with it being asleep.
O) Yes, use a Slumber Orb on the furthest Capsakid and avoid fighting it.
P) Yes, use a Slumber Orb on the furthest Capsakid and start a fight with it being asleep.
Q) Yes, use a Slumber Orb on the nearest Scraggy and avoid fighting it.
R) Yes, use a Slumber Orb on the nearest Scraggy and start a fight with it being asleep.
S) Yes, use a Slumber Orb on the second closest Scraggy and avoid fighting it.
T) Yes, use a Slumber Orb on the second closest Scraggy and start a fight with it being asleep.
U) Yes, use a Slumber Orb on the third closest Scraggy and avoid fighting it.
V) Yes, use a Slumber Orb on the third closest Scraggy and start a fight with it being asleep.
W) Yes, use a Slumber Orb on the furthest Scraggy and avoid fighting it.
X) Yes, use a Slumber Orb on the furthest Scraggy and start a fight with it being asleep.
Y) No, don't use a Slumber Orb now.
6-4) We have a Lob Orb. Do we use the Lob Orb in this room?
A) Yes, use a Lob Orb on the Cacnea in front of us.
B) Yes, use a Lob Orb on the second closest Cacnea.
C) Yes, use a Lob Orb on the third closest Cacnea.
D) Yes, use a Lob Orb on the furthest Cacnea.
E) Yes, use a Lob Orb on the Capsakid in front of us.
F) Yes, use a Lob Orb on the second closest Capsakid.
G) Yes, use a Lob Orb on the third closest Capsakid.
H) Yes, use a Lob Orb on the furthest Capsakid.
I) Yes, use a Lob Orb on the nearest Scraggy.
J) Yes, use a Lob Orb on the second closest Scraggy.
K) Yes, use a Lob Orb on the third closest Scraggy.
L) Yes, use a Lob Orb on the furthest Scraggy.
M) No, don't use a Lob Orb now.
6-5) We have a Two-Edge Orb, which Halves the HP of all foes in the room as well as the Party Leader. This Orb can only be used in rooms with 6 or more enemies. Do we use the Two-Edge Orb in this room?
A) Yes, use the Two-Edge Orb straight away.
B) Yes, use it after fighting the first opponent.
C) Yes, use it after fighting the second opponent.
D) Yes, use it after fighting the third opponent.
E) Yes, use it after fighting the fourth opponent.
F) Yes, use it after fighting the fifth opponent.
G) Yes, use it after fighting the sixth opponent.
H) Yes, use it after fighting the seventh opponent.
I) Yes, use it after fighting the eighth opponent.
K) Yes, use it after fighting the ninth opponent.
L) Yes, use it after fighting the tenth opponent.
M) Yes, use it after fighting the eleventh opponent.
N) Yes, use it after fighting the twelfth opponent.
O) No, don't use the Two-Edge Orb now.
If we vote to Resolve the situation peacefully in vote 4), the Orb votes will be ignored, as will the heal votes below.
7-1) We can heal after winning 2 double battles. Should we heal?
A) Yes, drink a Berry Juice. Heals up to 50 HP and also heals any status conditions.
B) Yes, eat an Oran Berry. Heals up to 100 HP.
C) Yes, eat a Sitrus Berry. Heals up to 250 HP.
D) No, don't heal up.
7-2) We can heal after winning 4 double battles. Should we heal?
A) Yes, drink a Berry Juice. Heals up to 50 HP and also heals any status conditions.
B) Yes, eat an Oran Berry. Heals up to 100 HP.
C) Yes, eat a Sitrus Berry. Heals up to 250 HP.
D) No, don't heal up.
7-3) We can heal after winning 6 double battles. Should we heal?
A) Yes, drink a Berry Juice. Heals up to 50 HP and also heals any status conditions.
B) Yes, eat an Oran Berry. Heals up to 100 HP.
C) Yes, eat a Sitrus Berry. Heals up to 250 HP.
D) No, don't heal up.
8) Which room do we go to next?
A) Go to room 1 from it's right Southern entry.
B) Go to room 1 from it's left Southern entry.
C) Go to room 2 from it's Southern entry.
D) Go to room 2 from it's Eastern entry.
E) Go to room 4 from it's upper Western entry.
F) Go to room 4 from it's Northern entry.
G) Go to room 4 from it's lower Western entry.
H) Go to room 3 from it's Western entry. (we'll have to fight the Nymble on the way).
I) Go to room 3 from its left Southern entry.
J) Go to room 3 from it's right Southern entry.
K) Go to room 6 from it's Western entry.
L) Go to room 6 from it's Eastern entry.
M) Go to room 6 from it's Southern entry.
N) Go to the Large Forest room to fight the remaining enemies and pick up the remaining items.
O) Go to room 8.
P) Go to room 7 from the Western entrance.
Q) Go to room 7 from the Northern entrance.
R) Go to room 9.
S) Go to room 10 from the Eastern entrance.
T) Go to room 10 from the Southern entrance.
U) Go to room 11 from the Northern entrance.
V) Go to room 11 from the Eastern entrance.
W) Go to room 11 from the Southern entrance.
X) Go to room 13.
Y) Go to the Move Releaner/Egg Move Tutor in the tree stump room.
9-1) After navigating the current room, but before heading to the next one, we can go heal at the Hot Spring. Should we heal?
A) Yes, go heal at the Hot Spring.
B) No, don't heal at the Hot Spring.
9-2) Now that we have a grass type in our party we meet the requirement for recruiting Pansage. Go recruit Pansage?
A) Yes, go recruit Pansage and send it to the hideout.
B) Yes, go recruit Pansage and send Simisear to the hideout.
C) Yes, go recruit Pansage and send Litleo to the hideout.
D) Yes, go recruit Pansage and send Simipour to the hideout.
E) Yes, go recruit Pansage and send Alolan Persian to the hideout.
F) Yes, go recruit Pansage and send Squawkabilly to the hideout.
G) Yes, go recruit Pansage and send Phantump to the hideout.
H) No, don't recruit Pansage now.
In case of a conflicting result for the item and storage votes below, the result of vote 1-2) will be prioritized.
If we fight in this room and use up any orbs then the results of the Orb votes will be prioritized as well.
If there aren't enough items deposited to make room for the items retrieved, the deposit vote will be prioritized and only the retrieve item votes that we actually have room for will be added. Say we deposit 5 items, and try to retrieve 7, the 6th and 7th retrieve item votes will be ignored.
10-1) We have items in storage. Retrieve an item from Abra Storage?
(we will need to make space in our inventory in order to actually retrieve items, see votes 11) below)
A) Retrieve the Black Belt from storage.
B) Retrieve the Brushoff Orb from storage.
C) Retrieve the Calcium from storage.
D) Retrieve the Carbos from storage.
E) Retrieve the Dragon Fang from Storage.
F) Retrieve the Totter Orb from storage.
G) Retrieve the Zinc from storage.
H) No, don't retrieve an item from storage.
10-2) We have items in storage. Retrieve a second item from Abra Storage?
(we will need to make space in our inventory in order to actually retrieve items, see votes 11) below)
A) Retrieve the Black Belt from storage.
B) Retrieve the Brushoff Orb from storage.
C) Retrieve the Calcium from storage.
D) Retrieve the Carbos from storage.
E) Retrieve the Dragon Fang from Storage.
F) Retrieve the Totter Orb from storage.
G) Retrieve the Zinc from storage.
H) No, don't retrieve a second item from storage.
10-3) We have items in storage. Retrieve a third item from Abra Storage?
(we will need to make space in our inventory in order to actually retrieve items, see votes 11) below)
A) Retrieve the Black Belt from storage.
B) Retrieve the Brushoff Orb from storage.
C) Retrieve the Calcium from storage.
D) Retrieve the Carbos from storage.
E) Retrieve the Dragon Fang from Storage.
F) Retrieve the Totter Orb from storage.
G) Retrieve the Zinc from storage.
H) No, don't retrieve a third item from storage.
10-4) We have items in storage. Retrieve a fourth item from Abra Storage?
(we will need to make space in our inventory in order to actually retrieve items, see votes 11) below)
A) Retrieve the Black Belt from storage.
B) Retrieve the Brushoff Orb from storage.
C) Retrieve the Calcium from storage.
D) Retrieve the Carbos from storage.
E) Retrieve the Dragon Fang from Storage.
F) Retrieve the Totter Orb from storage.
G) Retrieve the Zinc from storage.
H) No, don't retrieve a fourth item from storage.
10-5) We have items in storage. Retrieve a fifth item from Abra Storage?
(we will need to make space in our inventory in order to actually retrieve items, see votes 11) below)
A) Retrieve the Black Belt from storage.
B) Retrieve the Brushoff Orb from storage.
C) Retrieve the Calcium from storage.
D) Retrieve the Carbos from storage.
E) Retrieve the Dragon Fang from Storage.
F) Retrieve the Totter Orb from storage.
G) Retrieve the Zinc from storage.
H) No, don't retrieve a fifth item from storage.
10-6) We have items in storage. Retrieve a sixth item from Abra Storage?
(we will need to make space in our inventory in order to actually retrieve items, see votes 11) below)
A) Retrieve the Black Belt from storage.
B) Retrieve the Brushoff Orb from storage.
C) Retrieve the Calcium from storage.
D) Retrieve the Carbos from storage.
E) Retrieve the Dragon Fang from Storage.
F) Retrieve the Totter Orb from storage.
G) Retrieve the Zinc from storage.
H) No, don't retrieve a sixth item from storage.
10-7) We have items in storage. Retrieve a seventh item from Abra Storage?
(we will need to make space in our inventory in order to actually retrieve items, see votes 11) below)
A) Retrieve the Black Belt from storage.
B) Retrieve the Brushoff Orb from storage.
C) Retrieve the Calcium from storage.
D) Retrieve the Carbos from storage.
E) Retrieve the Dragon Fang from Storage.
F) Retrieve the Totter Orb from storage.
G) Retrieve the Zinc from storage.
H) No, don't retrieve an seventh item from storage.
11-1) Our other items pocket is full. Deposit an item?
A) Deposit the Blowback Orb into storage.
B) Deposit the Cell Battery into storage.
C) Deposit a Cleanse Orb into storage.
D) Deposit both Cleanse Orbs into storage.
E) Deposit the Hard Stone into storage.
F) Deposit a Lob Orb into storage.
G) Deposit both Lob Orbs into storage.
H) Deposit the Miracle Seed into storage.
I) Deposit a See-Trap Orb into storage.
J) Deposit 2 See-Trap Orbs into storage.
K) Deposit 3 See-Trap Orbs into storage.
L) Deposit all See-Trap Orbs into storage.
M) Deposit a Slumber Orb into storage.
N) Deposit both Slumber Orbs into storage.
O) Deposit the Soft Sand into storage.
P) Deposit the Trapbust Orb into storage.
Q) Deposit the Two-Edge Orb into storage.
R) No, don't deposit an item.
11-2) Our other items pocket is full. Deposit a second item?
A) Deposit the Blowback Orb into storage.
B) Deposit the Cell Battery into storage.
C) Deposit a Cleanse Orb into storage.
D) Deposit both Cleanse Orbs into storage.
E) Deposit the Hard Stone into storage.
F) Deposit a Lob Orb into storage.
G) Deposit both Lob Orbs into storage.
H) Deposit the Miracle Seed into storage.
I) Deposit a See-Trap Orb into storage.
J) Deposit 2 See-Trap Orbs into storage.
K) Deposit 3 See-Trap Orbs into storage.
L) Deposit all See-Trap Orbs into storage.
M) Deposit a Slumber Orb into storage.
N) Deposit both Slumber Orbs into storage.
O) Deposit the Soft Sand into storage.
P) Deposit the Trapbust Orb into storage.
Q) Deposit the Two-Edge Orb into storage.
R) No, don't deposit a second item.
11-3) Our other items pocket is full. Deposit a third item?
A) Deposit the Blowback Orb into storage.
B) Deposit the Cell Battery into storage.
C) Deposit a Cleanse Orb into storage.
D) Deposit both Cleanse Orbs into storage.
E) Deposit the Hard Stone into storage.
F) Deposit a Lob Orb into storage.
G) Deposit both Lob Orbs into storage.
H) Deposit the Miracle Seed into storage.
I) Deposit a See-Trap Orb into storage.
J) Deposit 2 See-Trap Orbs into storage.
K) Deposit 3 See-Trap Orbs into storage.
L) Deposit all See-Trap Orbs into storage.
M) Deposit a Slumber Orb into storage.
N) Deposit both Slumber Orbs into storage.
O) Deposit the Soft Sand into storage.
P) Deposit the Trapbust Orb into storage.
Q) Deposit the Two-Edge Orb into storage.
R) No, don't deposit a third item.
11-4) Our other items pocket is full. Deposit a fourth item?
A) Deposit the Blowback Orb into storage.
B) Deposit the Cell Battery into storage.
C) Deposit a Cleanse Orb into storage.
D) Deposit both Cleanse Orbs into storage.
E) Deposit the Hard Stone into storage.
F) Deposit a Lob Orb into storage.
G) Deposit both Lob Orbs into storage.
H) Deposit the Miracle Seed into storage.
I) Deposit a See-Trap Orb into storage.
J) Deposit 2 See-Trap Orbs into storage.
K) Deposit 3 See-Trap Orbs into storage.
L) Deposit all See-Trap Orbs into storage.
M) Deposit a Slumber Orb into storage.
N) Deposit both Slumber Orbs into storage.
O) Deposit the Soft Sand into storage.
P) Deposit the Trapbust Orb into storage.
Q) Deposit the Two-Edge Orb into storage.
R) No, don't deposit a fourth item.
11-5) Our other items pocket is full. Deposit a fifth item?
A) Deposit the Blowback Orb into storage.
B) Deposit the Cell Battery into storage.
C) Deposit a Cleanse Orb into storage.
D) Deposit both Cleanse Orbs into storage.
E) Deposit the Hard Stone into storage.
F) Deposit a Lob Orb into storage.
G) Deposit both Lob Orbs into storage.
H) Deposit the Miracle Seed into storage.
I) Deposit a See-Trap Orb into storage.
J) Deposit 2 See-Trap Orbs into storage.
K) Deposit 3 See-Trap Orbs into storage.
L) Deposit all See-Trap Orbs into storage.
M) Deposit a Slumber Orb into storage.
N) Deposit both Slumber Orbs into storage.
O) Deposit the Soft Sand into storage.
P) Deposit the Trapbust Orb into storage.
Q) Deposit the Two-Edge Orb into storage.
R) No, don't deposit a fifth item.
11-6) Our other items pocket is full. Deposit a sixth item?
A) Deposit the Blowback Orb into storage.
B) Deposit the Cell Battery into storage.
C) Deposit a Cleanse Orb into storage.
D) Deposit both Cleanse Orbs into storage.
E) Deposit the Hard Stone into storage.
F) Deposit a Lob Orb into storage.
G) Deposit both Lob Orbs into storage.
H) Deposit the Miracle Seed into storage.
I) Deposit a See-Trap Orb into storage.
J) Deposit 2 See-Trap Orbs into storage.
K) Deposit 3 See-Trap Orbs into storage.
L) Deposit all See-Trap Orbs into storage.
M) Deposit a Slumber Orb into storage.
N) Deposit both Slumber Orbs into storage.
O) Deposit the Soft Sand into storage.
P) Deposit the Trapbust Orb into storage.
Q) Deposit the Two-Edge Orb into storage.
R) No, don't deposit a sixth item.
11-7) Our other items pocket is full. Deposit a seventh item?
A) Deposit the Blowback Orb into storage.
B) Deposit the Cell Battery into storage.
C) Deposit a Cleanse Orb into storage.
D) Deposit both Cleanse Orbs into storage.
E) Deposit the Hard Stone into storage.
F) Deposit a Lob Orb into storage.
G) Deposit both Lob Orbs into storage.
H) Deposit the Miracle Seed into storage.
I) Deposit a See-Trap Orb into storage.
J) Deposit 2 See-Trap Orbs into storage.
K) Deposit 3 See-Trap Orbs into storage.
L) Deposit all See-Trap Orbs into storage.
M) Deposit a Slumber Orb into storage.
N) Deposit both Slumber Orbs into storage.
O) Deposit the Soft Sand into storage.
P) Deposit the Trapbust Orb into storage.
Q) Deposit the Two-Edge Orb into storage.
R) No, don't deposit a seventh item.
1-1: A
1-2: E
1-3: A
2: E
3: A
4: A
5: A
6-1: M
6-2: Y
6-3: Y
6-4: M
6-5: O
7-1: D
7-2: B
7-3: D
8: X
9-1: A
9-2: C
10-1: H
10-2: H
10-3: H
10-4: H
10-5: H
10-6: H
10-7: H
11-1: Q
11-2: O
11-3: I
11-4: H
11-5: E
11-6: B
11-7: R
1-1) C) Docile (Neutral nature) Several decent natures. Went with neutral, rather than the -Special Attack one, because of Hex.
1-2) E) Yes, have Phantump hold an Oran Berry.
1-3) D) Yes, forget Growth. Dropped Growth because of Will-o-Wisp with Hex. Definitely needs some non-Ghost move. Still gets walled by some Normal/Flying bird.
2) J) No, don't heal up. Heads to the Hot Spring after this. No point in using an item.
3) E) Yes, switch to Squawkabilly. Handles Grass types well. Does not plan to fight, however.
4) C) Resolve the situation peacefully by taking over the negotiations (Requires a Team Reputation of 150 or higher; Requirement has been met). Waited to do this option. Interesting on the hunting parties, but no thank you.
5) A) Offensively; nothing but attacking moves and prioritizes super-effective attacks if possible.
6-1) through 6-5) Do not use an orb.
7-1) through 7-3) D) No, don't heal up.
8) X) Go to room 13.
9-1) A) Yes, go heal at the Hot Spring. Always.
9-2) G) Yes, go recruit Pansage and send Phantump to the hideout. Cannot see Phantump accomplishing much until evolving. Hangs onto it for its field ability.
10-1) A) Retrieve the Black Belt from storage. Needs it for the Hawlucha.
10-2) through 10-7H) No, don't retrieve a second item from storage. Would be too much hassle to fiddle with vitamins.
11-1) B) Deposit the Cell Battery into storage. Boosts Attack when hit by an Electric attack. Will never have that at the right moment.
11-2) through 11-7) R) No, don't deposit a second item. Deals with this another time, as needed.
1-1) We've recruited Phantump. Phantump's stats are according to a neutral nature, pending what nature we vote for it. Which of the following natures does our newly recruited Phantump have?
A) Quiet (+Sp. Attack, -Speed) - 1 vote
B) Bold (+Defense, -Attack)
C) Docile (Neutral nature) - 1 vote
D) Impish (+Defense, -Sp. Attack)
Tied. Well, this line is already pretty slow. It's more of a physical attacker than a Special one, but I guess if I join A) we'll be a bit better with any Special attacks we know. Not really against the neutral nature either, but this line is already not that fast so... yeah I'll join A).
1-2) Have Phantump hold an item?
A) Yes, have Phantump hold the Cell Battery.
B) Yes, have Phantump hold the Hard Stone.
C) Yes, have Phantump hold the Miracle Seed.
D) Yes, have Phantump hold the Soft Sand.
E) Yes, have Phantump hold an Oran Berry. - 2 votes
F) Yes, have Phantump hold a Sitrus Berry.
G) Yes, have Phantump hold a Lum Berry.
H) Yes, have Phantump hold a Berry Juice.
I) No, don't have Phantump hold any items now.
1-3)Phantump can learn Bulldoze via TM. Teach Phantump Bulldoze?
A) Yes, forget Confuse Ray. - 1 vote
B) Yes, forget Will-O-Wisp.
C) Yes, forget Hex.
D) Yes, forget Growth. - 1 vote
E) No, don't learn Bulldoze
Tied. Confuse Ray vs Growth. I doubt either will be used as we play rooms offensively. I think having the potential buff from Growth might be more useful than having a move that induces confusion. Anyway... I'll join A).
2) Simisear is at 1/70 HP and Poisoned. Do we heal and/or treat the Poison?
A) Yes, drink a Berry Juice. Heals up to 50 HP and also heals any status conditions.
B) Yes, eat an Oran Berry. Heals up to 100 HP.
C) Yes, eat a Sitrus Berry. Heals up to 250 HP.
D) Yes, eat a Pecha Berry to cure the Poison.
E) Yes, eat a Pecha Berry to cure the Poison and an Oran Berry to heal up. - 1 vote
F) Yes, eat a Pecha Berry to cure the Poison and a Sitrus Berry to heal up.
G) Yes, eat a Lum Berry to cure the Poison.
H) Yes, eat a Lum Berry to cure the Poison and an Oran Berry to heal up.
I) Yes, eat a Lum Berry to cure the Poison and a Sitrus Berry to heal up.
J) No, don't heal up. - 1 vote
Tied. I'll join J) as I'll be joining E below.
3) Simisear is in the lead. Do we want to swap our lead for this room?
A) No, keep Simisear in the lead. - 1 vote
B) Yes, switch to Litleo.
C) Yes, switch to Simipour.
D) Yes, switch to Alolan Persian.
E) Yes, switch to Squawkabilly. - 1 vote
F) Yes, switch to Phantump.
Tied. I don't intend to fight. Better safe than sorry though, I guess? I'll join E)
4)The Pokemon here belong to the Scovillain Society. They are not outright hostile to us, but if we pick a fight with them or are goaded into one they will all band together to defeat us. How do we deal with the Scovillain Society in this room?
A) Let Smoliv try to convince them to hand over the stolen shipment and only interfere if a fight starts (-10 Scovillain Society Reputation). - 1 vote
B) Pick a fight with the Scovillain Society and take back the stolen shipment by force (-50 Scovillain Society Reputation).
C) Resolve the situation peacefully by taking over the negotiations (Requires a Team Reputation of 150 or higher - Requirement has been met). - 1 vote
D) Tell Smoliv to retreat and come back later.
E) Ditch Smoliv and leave it to it's fate (-30 Arboliva's Living Needs Reputation).
Tied. We've got the peaceful option unlocked, might as well use it. Might yet need something from the Scovillain Society in the future, so probably better to not burn any potential future diplomacy with them. Though conflict with them is probably inevitable in the long run. I'll join C).
5) If we end up fighting, how do we fight any enemies in this room?
A) Offensively; nothing but attacking moves and prioritizes super-effective attacks if possible. - 2 votes
B) Balanced; Uses both Attacking moves as well as non-attacking moves. Prioritizes super-effective attacks if possible. Uses attacking moves 66% of the time on average.
C) Defensively. Only attacks once every 3 turns. Uses the other two turns for non-attacking moves.
6-1) We have a Blowback Orb. Do we use the Blowback Orb in this room?
A) Yes, use a Blowback Orb on the Cacnea in front of us.
B) Yes, use a Blowback Orb on the second closest Cacnea.
C) Yes, use a Blowback Orb on the third closest Cacnea.
D) Yes, use a Blowback Orb on the furthest Cacnea.
E) Yes, use a Blowback Orb on the Capsakid in front of us.
F) Yes, use a Blowback Orb on the second closest Capsakid.
G) Yes, use a Blowback Orb on the third closest Capsakid.
H) Yes, use a Blowback Orb on the furthest Capsakid.
I) Yes, use a blowback Orb on the nearest Scraggy.
J) Yes, use a Blowback Orb on the second closest Scraggy.
K) Yes, use a Blowback Orb on the third closest Scraggy.
L) Yes, use a Blowback Orb on the furthest Scraggy.
M) No, don't use a Blowback Orb now. - 2 votes
6-2) A Slumber Orb puts an enemy to sleep so we can pass it without fighting it or start the fight with it asleep. Do we use a Slumber Orb in this room?
A) Yes, use a Slumber Orb on the Cacnea in front of us and avoid fighting it.
B) Yes, use a Slumber Orb on the Cacnea in front of us and start a fight with it being asleep.
C) Yes, use a Slumber Orb on the second closest Cacnea and avoid fighting it.
D) Yes, use a Slumber Orb on the second closest Cacnea and start a fight with it being asleep.
E) Yes, use a Slumber Orb on the third closest Cacnea and avoid fighting it.
F) Yes, use a Slumber Orb on the third closest Cacnea and start a fight with it being asleep.
G) Yes, use a Slumber Orb on the furthest Cacnea and avoid fighting it.
H) Yes, use a Slumber Orb on the furthest Cacnea and start a fight with it being asleep.
I) Yes, use a Slumber Orb on the Capsakid in front of us and avoid fighting it.
J) Yes, use a Slumber Orb on the Capsakid in front of us and start a fight with it being asleep.
K) Yes, use a Slumber Orb on the second closest Capsakid and avoid fighting it.
L) Yes, use a Slumber Orb on the second closest Capsakid and start a fight with it being asleep.
M) Yes, use a Slumber Orb on the third closest Capsakid and avoid fighting it.
N) Yes, use a Slumber Orb on the third closest Capsakid and start a fight with it being asleep.
O) Yes, use a Slumber Orb on the furthest Capsakid and avoid fighting it.
P) Yes, use a Slumber Orb on the furthest Capsakid and start a fight with it being asleep.
Q) Yes, use a Slumber Orb on the nearest Scraggy and avoid fighting it.
R) Yes, use a Slumber Orb on the nearest Scraggy and start a fight with it being asleep.
S) Yes, use a Slumber Orb on the second closest Scraggy and avoid fighting it.
T) Yes, use a Slumber Orb on the second closest Scraggy and start a fight with it being asleep.
U) Yes, use a Slumber Orb on the third closest Scraggy and avoid fighting it.
V) Yes, use a Slumber Orb on the third closest Scraggy and start a fight with it being asleep.
W) Yes, use a Slumber Orb on the furthest Scraggy and avoid fighting it.
X) Yes, use a Slumber Orb on the furthest Scraggy and start a fight with it being asleep.
Y) No, don't use a Slumber Orb now. - 2 votes
6-3) A Slumber Orb puts an enemy to sleep so we can pass it without fighting it or start the fight with it asleep. Do we use a second Slumber Orb in this room?
A) Yes, use a Slumber Orb on the Cacnea in front of us and avoid fighting it.
B) Yes, use a Slumber Orb on the Cacnea in front of us and start a fight with it being asleep.
C) Yes, use a Slumber Orb on the second closest Cacnea and avoid fighting it.
D) Yes, use a Slumber Orb on the second closest Cacnea and start a fight with it being asleep.
E) Yes, use a Slumber Orb on the third closest Cacnea and avoid fighting it.
F) Yes, use a Slumber Orb on the third closest Cacnea and start a fight with it being asleep.
G) Yes, use a Slumber Orb on the furthest Cacnea and avoid fighting it.
H) Yes, use a Slumber Orb on the furthest Cacnea and start a fight with it being asleep.
I) Yes, use a Slumber Orb on the Capsakid in front of us and avoid fighting it.
J) Yes, use a Slumber Orb on the Capsakid in front of us and start a fight with it being asleep.
K) Yes, use a Slumber Orb on the second closest Capsakid and avoid fighting it.
L) Yes, use a Slumber Orb on the second closest Capsakid and start a fight with it being asleep.
M) Yes, use a Slumber Orb on the third closest Capsakid and avoid fighting it.
N) Yes, use a Slumber Orb on the third closest Capsakid and start a fight with it being asleep.
O) Yes, use a Slumber Orb on the furthest Capsakid and avoid fighting it.
P) Yes, use a Slumber Orb on the furthest Capsakid and start a fight with it being asleep.
Q) Yes, use a Slumber Orb on the nearest Scraggy and avoid fighting it.
R) Yes, use a Slumber Orb on the nearest Scraggy and start a fight with it being asleep.
S) Yes, use a Slumber Orb on the second closest Scraggy and avoid fighting it.
T) Yes, use a Slumber Orb on the second closest Scraggy and start a fight with it being asleep.
U) Yes, use a Slumber Orb on the third closest Scraggy and avoid fighting it.
V) Yes, use a Slumber Orb on the third closest Scraggy and start a fight with it being asleep.
W) Yes, use a Slumber Orb on the furthest Scraggy and avoid fighting it.
X) Yes, use a Slumber Orb on the furthest Scraggy and start a fight with it being asleep.
Y) No, don't use a Slumber Orb now. - 2 votes
6-4) We have a Lob Orb. Do we use the Lob Orb in this room?
A) Yes, use a Lob Orb on the Cacnea in front of us.
B) Yes, use a Lob Orb on the second closest Cacnea.
C) Yes, use a Lob Orb on the third closest Cacnea.
D) Yes, use a Lob Orb on the furthest Cacnea.
E) Yes, use a Lob Orb on the Capsakid in front of us.
F) Yes, use a Lob Orb on the second closest Capsakid.
G) Yes, use a Lob Orb on the third closest Capsakid.
H) Yes, use a Lob Orb on the furthest Capsakid.
I) Yes, use a Lob Orb on the nearest Scraggy.
J) Yes, use a Lob Orb on the second closest Scraggy.
K) Yes, use a Lob Orb on the third closest Scraggy.
L) Yes, use a Lob Orb on the furthest Scraggy.
M) No, don't use a Lob Orb now. - 2 votes
6-5) We have a Two-Edge Orb, which Halves the HP of all foes in the room as well as the Party Leader. This Orb can only be used in rooms with 6 or more enemies. Do we use the Two-Edge Orb in this room?
A) Yes, use the Two-Edge Orb straight away.
B) Yes, use it after fighting the first opponent.
C) Yes, use it after fighting the second opponent.
D) Yes, use it after fighting the third opponent.
E) Yes, use it after fighting the fourth opponent.
F) Yes, use it after fighting the fifth opponent.
G) Yes, use it after fighting the sixth opponent.
H) Yes, use it after fighting the seventh opponent.
I) Yes, use it after fighting the eighth opponent.
K) Yes, use it after fighting the ninth opponent.
L) Yes, use it after fighting the tenth opponent.
M) Yes, use it after fighting the eleventh opponent.
N) Yes, use it after fighting the twelfth opponent.
O) No, don't use the Two-Edge Orb now. - 2 votes
7-1) We can heal after winning 2 double battles. Should we heal?
A) Yes, drink a Berry Juice. Heals up to 50 HP and also heals any status conditions.
B) Yes, eat an Oran Berry. Heals up to 100 HP.
C) Yes, eat a Sitrus Berry. Heals up to 250 HP.
D) No, don't heal up. - 2 votes
7-2) We can heal after winning 4 double battles. Should we heal?
A) Yes, drink a Berry Juice. Heals up to 50 HP and also heals any status conditions.
B) Yes, eat an Oran Berry. Heals up to 100 HP. - 1 vote
C) Yes, eat a Sitrus Berry. Heals up to 250 HP.
D) No, don't heal up. - 1 vote
Tied. But, we're resolving things peacefully so it doesn't matter as the orb and heal votes are only there for if we fight. I guess for formality I'll join D).
7-3) We can heal after winning 6 double battles. Should we heal?
A) Yes, drink a Berry Juice. Heals up to 50 HP and also heals any status conditions.
B) Yes, eat an Oran Berry. Heals up to 100 HP.
C) Yes, eat a Sitrus Berry. Heals up to 250 HP.
D) No, don't heal up. - 2 votes
8) Which room do we go to next?
A) Go to room 1 from it's right Southern entry.
B) Go to room 1 from it's left Southern entry.
C) Go to room 2 from it's Southern entry.
D) Go to room 2 from it's Eastern entry.
E) Go to room 4 from it's upper Western entry.
F) Go to room 4 from it's Northern entry.
G) Go to room 4 from it's lower Western entry.
H) Go to room 3 from it's Western entry. (we'll have to fight the Nymble on the way).
I) Go to room 3 from its left Southern entry.
J) Go to room 3 from it's right Southern entry.
K) Go to room 6 from it's Western entry.
L) Go to room 6 from it's Eastern entry.
M) Go to room 6 from it's Southern entry.
N) Go to the Large Forest room to fight the remaining enemies and pick up the remaining items.
O) Go to room 8.
P) Go to room 7 from the Western entrance. - 1 vote
Q) Go to room 7 from the Northern entrance.
R) Go to room 9.
S) Go to room 10 from the Eastern entrance.
T) Go to room 10 from the Southern entrance.
U) Go to room 11 from the Northern entrance.
V) Go to room 11 from the Eastern entrance.
W) Go to room 11 from the Southern entrance.
X) Go to room 13. - 2 votes
Y) Go to the Move Releaner/Egg Move Tutor in the tree stump room.
9-1) After navigating the current room, but before heading to the next one, we can go heal at the Hot Spring. Should we heal?
A) Yes, go heal at the Hot Spring. - 2 votes
B) No, don't heal at the Hot Spring.
9-2) Now that we have a grass type in our party we meet the requirement for recruiting Pansage. Go recruit Pansage?
A) Yes, go recruit Pansage and send it to the hideout.
B) Yes, go recruit Pansage and send Simisear to the hideout.
C) Yes, go recruit Pansage and send Litleo to the hideout. - 1 vote
D) Yes, go recruit Pansage and send Simipour to the hideout.
E) Yes, go recruit Pansage and send Alolan Persian to the hideout.
F) Yes, go recruit Pansage and send Squawkabilly to the hideout.
G) Yes, go recruit Pansage and send Phantump to the hideout. - 1 vote
H) No, don't recruit Pansage now.
So either two Fire types on the team or two grass types on the team... had to look up their level up moves to decide this.
Litleo learns Echoed Voice at level 33, which could be good if it uses it multiple times in a row. Probably won't use it more than twice if a row if at all though in the average fight. It picks up Flamethrower at level 36, 1 level higher than when it evolves. Though we can teach it Burning Jealousy upon evolution via TM so probably no need to wait for that.
Phantump learns Horn Leech at level 28 though. A good Physical Grass move that heals. Phantom Force at level 36.
I think in terms of moves they'll learn in the near-ish future, benching Litleo would be the better play.
I'll join C).
10-1) We have items in storage. Retrieve an item from Abra Storage? (we will need to make space in our inventory in order to actually retrieve items, see votes 10) below)
A) Retrieve the Black Belt from storage. - 1 vote
B) Retrieve the Brushoff Orb from storage.
C) Retrieve the Calcium from storage.
D) Retrieve the Carbos from storage.
E) Retrieve the Dragon Fang from Storage.
F) Retrieve the Totter Orb from storage.
G) Retrieve the Zinc from storage.
H) No, don't retrieve an item from storage. - 1 vote
Tied. I'll join A) so we can recruit Hawlucha.
10-2) We have items in storage. Retrieve a second item from Abra Storage? (we will need to make space in our inventory in order to actually retrieve items, see votes 10) below)
A) Retrieve the Black Belt from storage.
B) Retrieve the Brushoff Orb from storage.
C) Retrieve the Calcium from storage.
D) Retrieve the Carbos from storage.
E) Retrieve the Dragon Fang from Storage.
F) Retrieve the Totter Orb from storage.
G) Retrieve the Zinc from storage.
H) No, don't retrieve a second item from storage. - 2 votes
10-3) We have items in storage. Retrieve a third item from Abra Storage? (we will need to make space in our inventory in order to actually retrieve items, see votes 10) below)
A) Retrieve the Black Belt from storage.
B) Retrieve the Brushoff Orb from storage.
C) Retrieve the Calcium from storage.
D) Retrieve the Carbos from storage.
E) Retrieve the Dragon Fang from Storage.
F) Retrieve the Totter Orb from storage.
G) Retrieve the Zinc from storage.
H) No, don't retrieve a third item from storage. - 2 votes
10-4) We have items in storage. Retrieve a fourth item from Abra Storage? (we will need to make space in our inventory in order to actually retrieve items, see votes 10) below)
A) Retrieve the Black Belt from storage.
B) Retrieve the Brushoff Orb from storage.
C) Retrieve the Calcium from storage.
D) Retrieve the Carbos from storage.
E) Retrieve the Dragon Fang from Storage.
F) Retrieve the Totter Orb from storage.
G) Retrieve the Zinc from storage.
H) No, don't retrieve a fourth item from storage. - 2 votes
10-5) We have items in storage. Retrieve a fifth item from Abra Storage? (we will need to make space in our inventory in order to actually retrieve items, see votes 10) below)
A) Retrieve the Black Belt from storage.
B) Retrieve the Brushoff Orb from storage.
C) Retrieve the Calcium from storage.
D) Retrieve the Carbos from storage.
E) Retrieve the Dragon Fang from Storage.
F) Retrieve the Totter Orb from storage.
G) Retrieve the Zinc from storage.
H) No, don't retrieve a fifth item from storage. - 2 votes
10-6) We have items in storage. Retrieve a sixth item from Abra Storage? (we will need to make space in our inventory in order to actually retrieve items, see votes 10) below)
A) Retrieve the Black Belt from storage.
B) Retrieve the Brushoff Orb from storage.
C) Retrieve the Calcium from storage.
D) Retrieve the Carbos from storage.
E) Retrieve the Dragon Fang from Storage.
F) Retrieve the Totter Orb from storage.
G) Retrieve the Zinc from storage.
H) No, don't retrieve a sixth item from storage. - 2 votes
10-7) We have items in storage. Retrieve a seventh item from Abra Storage? (we will need to make space in our inventory in order to actually retrieve items, see votes 10) below)
A) Retrieve the Black Belt from storage.
B) Retrieve the Brushoff Orb from storage.
C) Retrieve the Calcium from storage.
D) Retrieve the Carbos from storage.
E) Retrieve the Dragon Fang from Storage.
F) Retrieve the Totter Orb from storage.
G) Retrieve the Zinc from storage.
H) No, don't retrieve an seventh item from storage. - 2 votes
11-1) Our other items pocket is full. Deposit an item?
A) Deposit the Blowback Orb into storage.
B) Deposit the Cell Battery into storage. - 1 vote
C) Deposit a Cleanse Orb into storage.
D) Deposit both Cleanse Orbs into storage.
E) Deposit the Hard Stone into storage.
F) Deposit a Lob Orb into storage.
G) Deposit both Lob Orbs into storage.
H) Deposit the Miracle Seed into storage.
I) Deposit a See-Trap Orb into storage.
J) Deposit 2 See-Trap Orbs into storage.
K) Deposit 3 See-Trap Orbs into storage.
L) Deposit all See-Trap Orbs into storage.
M) Deposit a Slumber Orb into storage.
N) Deposit both Slumber Orbs into storage.
O) Deposit the Soft Sand into storage.
P) Deposit the Trapbust Orb into storage.
Q) Deposit the Two-Edge Orb into storage. - 1 vote
R) No, don't deposit an item.
Tied. We can ditch the Cell Battery either by me joining B here or in 11-6). We might never end up using it.
Which means... do I want to ditch the Two-Edge Orb or not? Hmm... it can be a very useful crowd control orb in a busy room, when timed right. Like using it right before the fight with the last enemy before an in-room heal vote, though it does depend a bit on enemies fought in that room up to that point...
I'll join Q). It's a potent Orb when used right, but it's also a very situational Orb.
11-2) Our other items pocket is full. Deposit a second item?
A) Deposit the Blowback Orb into storage.
B) Deposit the Cell Battery into storage.
C) Deposit a Cleanse Orb into storage.
D) Deposit both Cleanse Orbs into storage.
E) Deposit the Hard Stone into storage.
F) Deposit a Lob Orb into storage.
G) Deposit both Lob Orbs into storage.
H) Deposit the Miracle Seed into storage.
I) Deposit a See-Trap Orb into storage.
J) Deposit 2 See-Trap Orbs into storage.
K) Deposit 3 See-Trap Orbs into storage.
L) Deposit all See-Trap Orbs into storage.
M) Deposit a Slumber Orb into storage.
N) Deposit both Slumber Orbs into storage.
O) Deposit the Soft Sand into storage. - 1 vote
P) Deposit the Trapbust Orb into storage.
Q) Deposit the Two-Edge Orb into storage.
R) No, don't deposit a second item. - 1 vote
Tied. No Ground types on our team atm. Might as well deposit it until we do have one. I'll join O).
11-3) Our other items pocket is full. Deposit a third item?
A) Deposit the Blowback Orb into storage.
B) Deposit the Cell Battery into storage.
C) Deposit a Cleanse Orb into storage.
D) Deposit both Cleanse Orbs into storage.
E) Deposit the Hard Stone into storage.
F) Deposit a Lob Orb into storage.
G) Deposit both Lob Orbs into storage.
H) Deposit the Miracle Seed into storage.
I) Deposit a See-Trap Orb into storage. - 1 vote
J) Deposit 2 See-Trap Orbs into storage.
K) Deposit 3 See-Trap Orbs into storage.
L) Deposit all See-Trap Orbs into storage.
M) Deposit a Slumber Orb into storage.
N) Deposit both Slumber Orbs into storage.
O) Deposit the Soft Sand into storage.
P) Deposit the Trapbust Orb into storage.
Q) Deposit the Two-Edge Orb into storage.
R) No, don't deposit a third item. - 1 vote
Tied. We have a stack of 4. Could store one for a rainy day I guess, but don't really see a need to atm. I'll join R).
11-4) Our other items pocket is full. Deposit a fourth item?
A) Deposit the Blowback Orb into storage.
B) Deposit the Cell Battery into storage.
C) Deposit a Cleanse Orb into storage.
D) Deposit both Cleanse Orbs into storage.
E) Deposit the Hard Stone into storage.
F) Deposit a Lob Orb into storage.
G) Deposit both Lob Orbs into storage.
H) Deposit the Miracle Seed into storage. - 1 vote
I) Deposit a See-Trap Orb into storage.
J) Deposit 2 See-Trap Orbs into storage.
K) Deposit 3 See-Trap Orbs into storage.
L) Deposit all See-Trap Orbs into storage.
M) Deposit a Slumber Orb into storage.
N) Deposit both Slumber Orbs into storage.
O) Deposit the Soft Sand into storage.
P) Deposit the Trapbust Orb into storage.
Q) Deposit the Two-Edge Orb into storage.
R) No, don't deposit a fourth item. - 1 vote
Tied. Could be an useful item for Pansage/Simisage, if we choose not to have it hold a berry. I'll join R) for now.
11-5) Our other items pocket is full. Deposit a fifth item?
A) Deposit the Blowback Orb into storage.
B) Deposit the Cell Battery into storage.
C) Deposit a Cleanse Orb into storage.
D) Deposit both Cleanse Orbs into storage.
E) Deposit the Hard Stone into storage. - 1 vote
F) Deposit a Lob Orb into storage.
G) Deposit both Lob Orbs into storage.
H) Deposit the Miracle Seed into storage.
I) Deposit a See-Trap Orb into storage.
J) Deposit 2 See-Trap Orbs into storage.
K) Deposit 3 See-Trap Orbs into storage.
L) Deposit all See-Trap Orbs into storage.
M) Deposit a Slumber Orb into storage.
N) Deposit both Slumber Orbs into storage.
O) Deposit the Soft Sand into storage.
P) Deposit the Trapbust Orb into storage.
Q) Deposit the Two-Edge Orb into storage.
R) No, don't deposit a fifth item. - 1 vote
Tied. Other than Power Gem on Persian we have no Rock moves. No Rock types on our team atm or currently known recruitable Rock types. Might as well ditch it in storage for the time being. I'll join E).
11-6) Our other items pocket is full. Deposit a sixth item?
A) Deposit the Blowback Orb into storage.
B) Deposit the Cell Battery into storage. - 1 vote
C) Deposit a Cleanse Orb into storage.
D) Deposit both Cleanse Orbs into storage.
E) Deposit the Hard Stone into storage.
F) Deposit a Lob Orb into storage.
G) Deposit both Lob Orbs into storage.
H) Deposit the Miracle Seed into storage.
I) Deposit a See-Trap Orb into storage.
J) Deposit 2 See-Trap Orbs into storage.
K) Deposit 3 See-Trap Orbs into storage.
L) Deposit all See-Trap Orbs into storage.
M) Deposit a Slumber Orb into storage.
N) Deposit both Slumber Orbs into storage.
O) Deposit the Soft Sand into storage.
P) Deposit the Trapbust Orb into storage.
Q) Deposit the Two-Edge Orb into storage.
R) No, don't deposit a sixth item. - 1 vote
Tied. Joining B).
11-7) Our other items pocket is full. Deposit a seventh item?
A) Deposit the Blowback Orb into storage.
B) Deposit the Cell Battery into storage.
C) Deposit a Cleanse Orb into storage.
D) Deposit both Cleanse Orbs into storage.
E) Deposit the Hard Stone into storage.
F) Deposit a Lob Orb into storage.
G) Deposit both Lob Orbs into storage.
H) Deposit the Miracle Seed into storage.
I) Deposit a See-Trap Orb into storage.
J) Deposit 2 See-Trap Orbs into storage.
K) Deposit 3 See-Trap Orbs into storage.
L) Deposit all See-Trap Orbs into storage.
M) Deposit a Slumber Orb into storage.
N) Deposit both Slumber Orbs into storage.
O) Deposit the Soft Sand into storage.
P) Deposit the Trapbust Orb into storage.
Q) Deposit the Two-Edge Orb into storage.
R) No, don't deposit a seventh item. - 2 votes
1-1: A
1-2: E
1-3: A
2: E
3: A
4: A
5: A
6-1: M
6-2: Y
6-3: Y
6-4: M
6-5: O
7-1: D
7-2: B
7-3: D
8: X
9-1: A
9-2: C
10-1: H
10-2: H
10-3: H
10-4: H
10-5: H
10-6: H
10-7: H
11-1: Q
11-2: O
11-3: I
11-4: H
11-5: E
11-6: B
11-7: R
1-1) C) Docile (Neutral nature) Several decent natures. Went with neutral, rather than the -Special Attack one, because of Hex.
1-2) E) Yes, have Phantump hold an Oran Berry.
1-3) D) Yes, forget Growth. Dropped Growth because of Will-o-Wisp with Hex. Definitely needs some non-Ghost move. Still gets walled by some Normal/Flying bird.
2) J) No, don't heal up. Heads to the Hot Spring after this. No point in using an item.
3) E) Yes, switch to Squawkabilly. Handles Grass types well. Does not plan to fight, however.
4) C) Resolve the situation peacefully by taking over the negotiations (Requires a Team Reputation of 150 or higher; Requirement has been met). Waited to do this option. Interesting on the hunting parties, but no thank you.
5) A) Offensively; nothing but attacking moves and prioritizes super-effective attacks if possible.
6-1) through 6-5) Do not use an orb.
7-1) through 7-3) D) No, don't heal up.
8) X) Go to room 13.
9-1) A) Yes, go heal at the Hot Spring. Always.
9-2) G) Yes, go recruit Pansage and send Phantump to the hideout. Cannot see Phantump accomplishing much until evolving. Hangs onto it for its field ability.
10-1) A) Retrieve the Black Belt from storage. Needs it for the Hawlucha.
10-2) through 10-7H) No, don't retrieve a second item from storage. Would be too much hassle to fiddle with vitamins.
11-1) B) Deposit the Cell Battery into storage. Boosts Attack when hit by an Electric attack. Will never have that at the right moment.
11-2) through 11-7) R) No, don't deposit a second item. Deals with this another time, as needed.
Phantump has a Quiet Nature and will be holding an Oran Berry. We teach Phantump Bulldoze via TM and have it forget Confuse Ray.
We don't heal up Simisear and we put Squawkabilly in the lead. We fight any enemies in the room offensively, if we fight.
We resolve the situation with the Scovillain Society peacefully by taking over the negotiations, and as a result we will be not doing any fighting in this room, so we do not use any Orbs in this room nor do we need to heal up after fighting any enemies in double battles.
We go to room 13 next, after healing up at the Hot spring and recruiting Pansage and sending Litleo to the hideout.
We only retrieve the Black Belt from storage and no other items.
We deposit the following items into Abra Storage: the Two-Edge Orb, Soft Sand, Hard Stone & Cell Battery.
The dialogue with the Capsakid & Cacnea guards:
Spoiler:
The dialogue with Scovillain:
Spoiler:
The private dialogue with just Scovillain:
Spoiler:
Team Roundabout:
Spoiler:
Effort Values.
Effort Values Earned, Persian:
4 HP Points
1 Defense Point
3 Sp. Attack Points
2 Speed Points
Litleo, Male.
Level: 24
Ability: Unnerve
Moves: Fire Fang, Ember, Work up, Headbutt
Nature: Calm
Inventory:
Spoiler:
Abra Storage (Item Storage for full inventory sections):
Spoiler:
Quests:
Spoiler:
Main Quest:
-Escape the Dungeon.
Side Quests:
-Halted Negotiations
Objective: Find the third Smoliv running an errand to the Construction Company.
Reward: 2 Blue Shards, a Sitrus Berry and a Lob Orb. + 40 Faction Reputation for Arboliva's Living Needs and Exp based on the lead's level when turning in the quest.
Optional Path: Help Smoliv confront the Scovillain Society and retrieve the stolen shipment.
Optional Path Reward: Trailblaze TM, 2 Yellow Shards and 2 Blue shards and Smoliv becomes recruitable if we complete the optional path before reporting in to his brother.
-The Lost Shipment
Objective: Find out if the food shipment was really stolen or not and retrieve it if so.
Reward: Dig TM and a Brushoff Orb. + 25 Team Reputation and Exp based on the lead's level when turning in the quest.
Faction Quests:
-
Completed Quests:
Spoiler:
1) The Lost Hairpin (Side Quest)
Objective: Find Chikorita's hairpin. It's somewhere along the route she described.
Reward: 3 Green Shards, 2 Yellow Shards and a Blowback Orb. + 20 Team Reputation and Exp based on the lead's level when turning in the quest.
2) Left Behind (Side Quest)
Objective: Escort Smoliv back to the merchant stand.
Reward: 2 Yellow Shards, 2 Green Shards, 1 Blue Shard & 1 Trapbust Orb + 30 Faction Reputation for Arboliva's Living Needs and Exp based on the lead's level when turning in the quest.
3) Merchant Guard Recruitment
Objective: Seek out any of the three candidates mentioned by Torterra and get them to hear you out.
Reward: 1 Blue Shard + 2 Yellow Shards + 1 Carbos, 1 Calcium & 1 Protein. + 50 Team Reputation and Exp based on the lead's level when turning in the quest.
Bonus Objective Completed: Get all of the candidates to hear you out before making a decision on which guard to send to Torterra.
Additional Reward Unlocked: 1 Carbos, 1 Calcium & 1 Protein + 1 See-Trap Orb
Failed or Refused Quests:
-Spider Trouble (Refused)
Objective: Defeat a group of Spinarak led by an Ariados for Chespin.
Reputation:
Spoiler:
Team Roundabout's Reputation:
165 Rep
Spoiler:
+30 Team Reputation for helping Roserade save her Budew from the Grimer. (Act 1 - Chapter 12 )
+20 Team Reputation for helping Breloom find his Shroomish. (Act 1 - Chapter 17)
+20 Team Reputation for completing the 'The Lost Hairpin' Side Quest (Act 1 - Chapter 19)
+15 Team Reputation for helping Lilligant deal with the Squawkabilly (Act 1 - Chapter 24)
+50 Team Reputation for completing the Merchant Guard Recruitment quest (Act 1 - Chapter 30)
+30 Team Reputation for defeating all the Pumpkaboo and helping Phantump escape (Act 1 - Chapter 38)
Faction Reputation:
-Arboliva's Living Needs:
50 Rep - Merchant trade inventory has expanded!
Spoiler:
+20 Faction Reputation for helping the Smoliv beat the Capsakid in a fight. (Act 1 - Chapter 2)
+30 Faction Reputation for completing the 'Left Behind' Side Quest (Act 1 - Chapter 19)
-Scovillain Society:
0 Rep
Spoiler:
No Faction Reputation earned.
Dungeon Map:
Spoiler:
The green dot is where we are currently. Cyan dots are items we didn't pick up. Red dots are optional enemies we didn't fight.
The Green X marks the location of the construction company where the third Smoliv is supposed to be.
The Cyan X marks the location of the Scovillain Society's camp.
The recruiting dialogue with Pansage before we head to the next room:
Spoiler:
We arrive at the room that was marked with a 13 on the map. The Eastern room has 3 hostile Fighting types and 1 hostile Dark type.
1-1) We've recruited Pansage. Pansage's stats are according to a neutral nature, pending what nature we vote for it. Which of the following natures does our newly recruited Pansage have?
A) Modest (+Sp. Attack, -Attack)
B) Timid (+Speed, -Attack)
C) Lonely (+Attack, -Defense)
D) Naïve (+Speed, -Sp. Defense)
1-2) Have Pansage hold an item?
A) Yes, have Pansage hold the Black Belt.
B) Yes, have Pansage hold the Charcoal.
C) Yes, have Pansage hold the Miracle Seed.
D) Yes, have Pansage hold an Oran Berry.
E) Yes, have Pansage hold a Sitrus Berry.
F) Yes, have Pansage hold a Lum Berry.
G) Yes, have Pansage hold a Berry Juice.
H) No, don't have Pansage hold any items now.
2-1) Pansage can learn Bullet Seed via TM. Teach Pansage Bullet Seed?
A) Yes, forget Fury Swipes.
B) Yes, forget Leech Seed.
C) Yes, forget Bite.
D) Yes, forget Seed Bomb.
E) No, don't learn Bullet Seed.
2-2) Pansage can learn Acrobatics via TM. Teach Pansage Acrobatics?
A) Yes, forget Fury Swipes.
B) Yes, forget Leech Seed.
C) Yes, forget Bite.
D) Yes, forget Seed Bomb.
E) No, don't learn Acrobatics.
If there's a conflict between 2-1) and 2-2), 2-1) will be prioritized.
3) Squawkabilly is in the lead. Do we want to swap our lead for this room?
A) No, keep Squawkabilly in the lead.
B) Yes, switch to Pansage.
C) Yes, switch to Simipour.
D) Yes, switch to Alolan Persian.
E) Yes, switch to Simisear.
F) Yes, switch to Phantump.
4) How do we fight any enemies in this room?
A) Offensively; nothing but attacking moves and prioritizes super-effective attacks if possible.
B) Balanced; Uses both Attacking moves as well as non-attacking moves. Prioritizes super-effective attacks if possible. Uses attacking moves 66% of the time on average.
C) Defensively. Only attacks once every 3 turns. Uses the other two turns for non-attacking moves.
5-1) The Varoom will attack us if we go anywhere North of the path towards the Eastern room. We can pass through without fighting if we head directly East. The Varoom will however knock out the Milcery if we do. The Milcery would be willing to join us if we help her out here. We'll also earn 15 Team Reputation for helping the Milcery out. Do we attack the Varoom to help out the Milcery?
A) Yes, attack the Varoom and help out the Milcery.
B) No, ignore the Milcery and don't attack the Varoom.
5-2)If we helped her out, Do we recruit Milcery?
A) Yes, recruit Milcery and send her to the hideout.
B) Yes, recruit Milcery and send Squawkabilly to the hideout.
C) Yes, recruit Milcery and send Pansage to the hideout.
D) Yes, recruit Milcery and send Simipour to the hideout.
E) Yes, recruit Milcery and send Alolan Persian to the hideout.
F) Yes, recruit Milcery and send Simisear to the hideout.
G) Yes, recruit Milcery and send Phantump to the hideout.
H) No, don't recruit Milcery now.
Ended up in a situation where we can recruit a bunch of Pokemon in a row lol
Phantump -> Pansage -> Milcery -> Hawlucha -> Smoliv
Recruitable Pokemon are in fixed locations. I did not want to leave whether or not we encounter any up to RNG.
6-1) We have a Blowback Orb. Do we use the Blowback Orb in this room?
A) Yes, use a Blowback Orb on the level 25 Varoom.
B) Yes, use a Blowback Orb on the level 24 Varoom.
C) No, don't use a Blowback Orb now.
6-2) A See-Trap Orb reveals all traps in the current room and the lead Pokemon will avoid stepping on them if possible. Do we use a See-Trap Orb in this room?
A) Yes, use a See-Trap Orb.
B) No, don't use a See-Trap Orb now.
6-3) The Trapbust Orb destroys all traps in the current room. Do we use the Trapbust Orb in this room?
A) Yes, use the Trapbust Orb.
B) No, don't use the Trapbust Orb now.
6-4) A Slumber Orb puts an enemy to sleep so we can pass it without fighting it or start the fight with it asleep. Do we use a Slumber Orb in this room?
A) Yes, use a Slumber Orb on the level 25 Varoom and avoid fighting it.
B) Yes, use a Slumber Orb on the level 25 Varoom and start a fight with it being asleep.
C) Yes, use a Slumber Orb on the level 24 Varoom and avoid fighting it.
D) Yes, use a Slumber Orb on the level 24 Varoom and start a fight with it being asleep.
E) No, don't use a Slumber Orb now.
6-5) A Slumber Orb puts an enemy to sleep so we can pass it without fighting it or start the fight with it asleep. Do we use a second Slumber Orb in this room?
A) Yes, use a Slumber Orb on the level 25 Varoom and avoid fighting it.
B) Yes, use a Slumber Orb on the level 25 Varoom and start a fight with it being asleep.
C) Yes, use a Slumber Orb on the level 24 Varoom and avoid fighting it.
D) Yes, use a Slumber Orb on the level 24 Varoom and start a fight with it being asleep.
E) No, don't use a Slumber Orb now.
6-6) We have a Lob Orb. Do we use the Lob Orb in this room?
A) Yes, use a Lob Orb on the level 25 Varoom.
B) Yes, use a Lob Orb on the level 24 Varoom.
C) No, don't use a Lob Orb now.
7) We can heal after defeating 2 opponents. Should we heal?
A) Yes, drink a Berry Juice. Heals up to 50 HP and also heals any status conditions.
B) Yes, eat an Oran Berry. Heals up to 100 HP.
C) Yes, eat a Sitrus Berry. Heals up to 250 HP.
D) No, don't heal up.
8) What do we do with the items in this room?
A) Pick up all items.
B) Pick up only the items that don't result in fighting the Varoom.
C) Pick up only the Gold Scarf.
D) Pick up only the Sitrus Berry.
E) Pick up only the Green Shards.
F) Pick up only the Yellow Shards.
G) Pick up the Green & Yellow Shards.
H) Pick up the Green Shards and the Sitrus Berry.
I) Pick up the Green Shards and the Gold Scarf.
J) Pick up the Yellow Shards and the Sitrus Berry.
K) Pick up the Yellow Shard and the Gold Scarf.
L) Pick up the Sitrus Berry and the Gold Scarf.
M) Pick up the Sitrus Berry, the Gold Scarf and the Green Shards.
N)Pick up the Sitrus Berry, the Gold Scarf and the Yellow Shards.
O) Pick up the Gold Scarf, the Yellow and the Green Shards.
P) Pick up the Sitrus Berry, the Yellow Shards and the Green Shards.
9) Which room do we go to next?
A) Go to room 1 from it's right Southern entry.
B) Go to room 1 from it's left Southern entry.
C) Go to room 2 from it's Southern entry.
D) Go to room 2 from it's Eastern entry.
E) Go to room 4 from it's upper Western entry.
F) Go to room 4 from it's Northern entry.
G) Go to room 4 from it's lower Western entry.
H) Go to room 3 from it's Western entry. (we'll have to fight the Nymble on the way).
I) Go to room 3 from its left Southern entry.
J) Go to room 3 from it's right Southern entry.
K) Go to room 6 from it's Western entry.
L) Go to room 6 from it's Eastern entry.
M) Go to room 6 from it's Southern entry.
N) Go to the Large Forest room to fight the remaining enemies and pick up the remaining items.
O) Go to room 8.
P) Go to room 7 from the Western entrance.
Q) Go to room 7 from the Northern entrance.
R) Go to room 9.
S) Go to room 10 from the Eastern entrance.
T) Go to room 10 from the Southern entrance.
U) Go to room 11 from the Northern entrance.
V) Go to room 11 from the Eastern entrance.
W) Go to room 11 from the Southern entrance.
X) Go to room 13.
Y) Go to the Move Releaner/Egg Move Tutor in the tree stump room.
Z) Go to the Merchant Stand.
?) Go to the Construction Company.
10) Now that we have a Black Belt in our inventory we meet the requirement for recruiting Hawlucha. Go recruit Hawlucha?
A) Yes, recruit Hawlucha and send it to the hideout.
B) Yes, recruit Hawlucha and send Squawkabilly to the hideout.
C) Yes, recruit Hawlucha and send Pansage to the hideout.
D) Yes, recruit Hawlucha and send Simipour to the hideout.
E) Yes, recruit Hawlucha and send Alolan Persian to the hideout.
F) Yes, recruit Hawlucha and send Simisear to the hideout.
G) Yes, recruit Hawlucha and send Phantump to the hideout.
H) No, don't recruit Hawlucha now.
Vote 9) will be ignored if we give Pansage the Black Belt to hold.
If there's a conflict between this vote and 5-2), then 5-2) will be prioritized and Hawlucha will be sent to the Hideout by default.
1-1) C) Lonely (+Attack, -Defense) Not great choices here. Hates to drop Attack, so not the first two. Already moves pretty quick (base 101 Speed).
1-2) C) Yes, have Pansage hold the Miracle Seed.
2-1) A) Yes, forget Fury Swipes. Would rather have a backup Grass move in case of the PP trap than Fury Swipes.
2-2) B) Yes, forget Leech Seed. Likes Leech Seed, but not on this Pokemon (and in this format).
3) E) Yes, switch to Simisear. Wanted to do Phantump for Bulldoze and some experience. Probably handles Sludge (30 base Special Attack for Varoom) and Gyro Ball fine. Sees Assurance on that level 24, unfortunately.
4) A) Offensively; nothing but attacking moves and prioritizes super-effective attacks if possible.
5-1) A) Yes, attack the Varoom and help out the Milcery. More friends.
5-2) A) Yes, recruit Milcery and send her to the hideout. Accomplishes nothing unevolved, unfortunately.
6-1) C) No, don't use a Blowback Orb now.
6-2) B) No, don't use a See-Trap Orb now.
6-3) B) No, don't use the Trapbust Orb now.
6-4) E) No, don't use a Slumber Orb now.
6-5) E) No, don't use a Slumber Orb now.
6-6) C) No, don't use a Lob Orb now.
7) D) No, don't heal up. Not too many enemies in this room.
8) A) Pick up all items.
9) ?) Go to the Construction Company. Wants to crack open that treasure chest. (Also needs to Rock Smash a few old things. May be able to handle those without visiting the room.)
10) G) Yes, recruit Hawlucha and send Phantump to the hideout. Expects the least from Phantump.
1-1) We've recruited Pansage. Pansage's stats are according to a neutral nature, pending what nature we vote for it. Which of the following natures does our newly recruited Pansage have?
A) Modest (+Sp. Attack, -Attack)
B) Timid (+Speed, -Attack)
C) Lonely (+Attack, -Defense) - 1 vote
D) Naïve (+Speed, -Sp. Defense) - 1 votes
Tied. Not much of a preference here, but I'm leaning towards Lonely... yeah, I'll join C).
1-2) Have Pansage hold an item?
A) Yes, have Pansage hold the Black Belt.
B) Yes, have Pansage hold the Charcoal.
C) Yes, have Pansage hold the Miracle Seed. - 2 votes
D) Yes, have Pansage hold an Oran Berry.
E) Yes, have Pansage hold a Sitrus Berry.
F) Yes, have Pansage hold a Lum Berry.
G) Yes, have Pansage hold a Berry Juice.
H) No, don't have Pansage hold any items now.
2-1)Pansage can learn Bullet Seed via TM. Teach Pansage Bullet Seed?
A) Yes, forget Fury Swipes. - 2 votes
B) Yes, forget Leech Seed.
C) Yes, forget Bite.
D) Yes, forget Seed Bomb.
E) No, don't learn Bullet Seed.
2-2)Pansage can learn Acrobatics via TM. Teach Pansage Acrobatics?
A) Yes, forget Fury Swipes.
B) Yes, forget Leech Seed. - 2 votes
C) Yes, forget Bite.
D) Yes, forget Seed Bomb.
E) No, don't learn Acrobatics.
3) Squawkabilly is in the lead. Do we want to swap our lead for this room?
A) No, keep Squawkabilly in the lead.
B) Yes, switch to Pansage.
C) Yes, switch to Simipour.
D) Yes, switch to Alolan Persian.
E) Yes, switch to Simisear. - 2 votes
F) Yes, switch to Phantump.
4) How do we fight any enemies in this room?
A) Offensively; nothing but attacking moves and prioritizes super-effective attacks if possible. - 2 votes
B) Balanced; Uses both Attacking moves as well as non-attacking moves. Prioritizes super-effective attacks if possible. Uses attacking moves 66% of the time on average.
C) Defensively. Only attacks once every 3 turns. Uses the other two turns for non-attacking moves.
5-1) The Varoom will attack us if we go anywhere North of the path towards the Eastern room. We can pass through without fighting if we head directly East. The Varoom will however knock out the Milcery if we do. The Milcery would be willing to join us if we help her out here. Do we attack the Varoom to help out the Milcery?
A) Yes, attack the Varoom and help out the Milcery. - 2 votes
B) No, ignore the Milcery and don't attack the Varoom.
5-2)If we helped her out, Do we recruit Milcery?
A) Yes, recruit Milcery and send it to the hideout. - 2 votes
B) Yes, recruit Milcery and send Squawkabilly to the hideout.
C) Yes, recruit Milcery and send Pansage to the hideout.
D) Yes, recruit Milcery and send Simipour to the hideout.
E) Yes, recruit Milcery and send Alolan Persian to the hideout.
F) Yes, recruit Milcery and send Simisear to the hideout.
G) Yes, recruit Milcery and send Phantump to the hideout.
H) No, don't recruit Milcery now.
6-1) We have a Blowback Orb. Do we use the Blowback Orb in this room?
A) Yes, use a Blowback Orb on the level 25 Varoom.
B) Yes, use a Blowback Orb on the level 24 Varoom.
C) No, don't use a Blowback Orb now. - 2 votes
6-2) A See-Trap Orb reveals all traps in the current room and the lead Pokemon will avoid stepping on them if possible. Do we use a See-Trap Orb in this room?
A) Yes, use a See-Trap Orb.
B) No, don't use a See-Trap Orb now. - 2 votes
6-3) The Trapbust Orb destroys all traps in the current room. Do we use the Trapbust Orb in this room?
A) Yes, use the Trapbust Orb.
B) No, don't use the Trapbust Orb now. - 2 votes
6-4) A Slumber Orb puts an enemy to sleep so we can pass it without fighting it or start the fight with it asleep. Do we use a Slumber Orb in this room?
A) Yes, use a Slumber Orb on the level 25 Varoom and avoid fighting it.
B) Yes, use a Slumber Orb on the level 25 Varoom and start a fight with it being asleep.
C) Yes, use a Slumber Orb on the level 24 Varoom and avoid fighting it.
D) Yes, use a Slumber Orb on the level 24 Varoom and start a fight with it being asleep.
E) No, don't use a Slumber Orb now. - 2 votes
6-5) A Slumber Orb puts an enemy to sleep so we can pass it without fighting it or start the fight with it asleep. Do we use a second Slumber Orb in this room?
A) Yes, use a Slumber Orb on the level 25 Varoom and avoid fighting it.
B) Yes, use a Slumber Orb on the level 25 Varoom and start a fight with it being asleep.
C) Yes, use a Slumber Orb on the level 24 Varoom and avoid fighting it.
D) Yes, use a Slumber Orb on the level 24 Varoom and start a fight with it being asleep.
E) No, don't use a Slumber Orb now. - 2 votes
6-6) We have a Lob Orb. Do we use the Lob Orb in this room?
A) Yes, use a Lob Orb on the level 25 Varoom.
B) Yes, use a Lob Orb on the level 24 Varoom.
C) No, don't use a Lob Orb now. - 2 votes
7) We can heal after defeating 2 opponents. Should we heal?
A) Yes, drink a Berry Juice. Heals up to 50 HP and also heals any status conditions.
B) Yes, eat an Oran Berry. Heals up to 100 HP.
C) Yes, eat a Sitrus Berry. Heals up to 250 HP.
D) No, don't heal up. - 2 votes
8) What do we do with the items in this room?
A) Pick up all items. - 2 votes
B) Pick up only the items that don't result in fighting the Varoom.
C) Pick up only the Gold Scarf.
D) Pick up only the Sitrus Berry.
E) Pick up only the Green Shards.
F) Pick up only the Yellow Shards.
G) Pick up the Green & Yellow Shards.
H) Pick up the Green Shards and the Sitrus Berry.
I) Pick up the Green Shards and the Gold Scarf.
J) Pick up the Yellow Shards and the Sitrus Berry.
K) Pick up the Yellow Shard and the Gold Scarf.
L) Pick up the Sitrus Berry and the Gold Scarf.
M) Pick up the Sitrus Berry, the Gold Scarf and the Green Shards.
N)Pick up the Sitrus Berry, the Gold Scarf and the Yellow Shards.
O) Pick up the Gold Scarf, the Yellow and the Green Shards.
P) Pick up the Sitrus Berry, the Yellow Shards and the Green Shards.
9) Which room do we go to next?
A) Go to room 1 from it's right Southern entry.
B) Go to room 1 from it's left Southern entry.
C) Go to room 2 from it's Southern entry.
D) Go to room 2 from it's Eastern entry.
E) Go to room 4 from it's upper Western entry.
F) Go to room 4 from it's Northern entry.
G) Go to room 4 from it's lower Western entry.
H) Go to room 3 from it's Western entry. (we'll have to fight the Nymble on the way).
I) Go to room 3 from its left Southern entry.
J) Go to room 3 from it's right Southern entry.
K) Go to room 6 from it's Western entry.
L) Go to room 6 from it's Eastern entry.
M) Go to room 6 from it's Southern entry.
N) Go to the Large Forest room to fight the remaining enemies and pick up the remaining items.
O) Go to room 8.
P) Go to room 7 from the Western entrance.
Q) Go to room 7 from the Northern entrance.
R) Go to room 9.
S) Go to room 10 from the Eastern entrance.
T) Go to room 10 from the Southern entrance.
U) Go to room 11 from the Northern entrance.
V) Go to room 11 from the Eastern entrance.
W) Go to room 11 from the Southern entrance.
X) Go to room 13.
Y) Go to the Move Releaner/Egg Move Tutor in the tree stump room.
Z) Go to the Merchant Stand.
?) Go to the Construction Company. - 2 votes
10) Now that we have a Black Belt in our inventory we meet the requirement for recruiting Hawlucha. Go recruit Hawlucha?
A) Yes, recruit Hawlucha and send it to the hideout.
B) Yes, recruit Hawlucha and send Squawkabilly to the hideout.
C) Yes, recruit Hawlucha and send Pansage to the hideout.
D) Yes, recruit Hawlucha and send Simipour to the hideout.
E) Yes, recruit Hawlucha and send Alolan Persian to the hideout.
F) Yes, recruit Hawlucha and send Simisear to the hideout.
G) Yes, recruit Hawlucha and send Phantump to the hideout. - 2 votes
H) No, don't recruit Hawlucha now.
1-1) C) Lonely (+Attack, -Defense) Not great choices here. Hates to drop Attack, so not the first two. Already moves pretty quick (base 101 Speed).
1-2) C) Yes, have Pansage hold the Miracle Seed.
2-1) A) Yes, forget Fury Swipes. Would rather have a backup Grass move in case of the PP trap than Fury Swipes.
2-2) B) Yes, forget Leech Seed. Likes Leech Seed, but not on this Pokemon (and in this format).
3) E) Yes, switch to Simisear. Wanted to do Phantump for Bulldoze and some experience. Probably handles Sludge (30 base Special Attack for Varoom) and Gyro Ball fine. Sees Assurance on that level 24, unfortunately.
4) A) Offensively; nothing but attacking moves and prioritizes super-effective attacks if possible.
5-1) A) Yes, attack the Varoom and help out the Milcery. More friends.
5-2) A) Yes, recruit Milcery and send her to the hideout. Accomplishes nothing unevolved, unfortunately.
6-1) C) No, don't use a Blowback Orb now.
6-2) B) No, don't use a See-Trap Orb now.
6-3) B) No, don't use the Trapbust Orb now.
6-4) E) No, don't use a Slumber Orb now.
6-5) E) No, don't use a Slumber Orb now.
6-6) C) No, don't use a Lob Orb now.
7) D) No, don't heal up. Not too many enemies in this room.
8) A) Pick up all items.
9) ?) Go to the Construction Company. Wants to crack open that treasure chest. (Also needs to Rock Smash a few old things. May be able to handle those without visiting the room.)
10) G) Yes, recruit Hawlucha and send Phantump to the hideout. Expects the least from Phantump.
Pansage has a Lonely nature and we have Pansage hold the Miracle Seed.
We teach Pansage Bullet Seed and have it forget Fury Swipes. We also teach it Acrobatics and have it forget Leech Seed.
We switch the lead to Simisear and fight any enemies in this room offensively.
We attack the Varoom and help out the Milcery and then recruit Milcery and send it to the hideout.
We don't use any Orbs in this room and we don't heal after defeating 2 opponents.
We pick up all items and go to the Construction Company next.
We go recruit Hawlucha and send Phantump to the hideout.
The path we take is as follows:
Stepped on a Sticky Trap. TM035 Burning Jealousy became sticky and can't be used or removed from the inventory until it's cleansed.
Stepped on a Gust Trap. Simisear got flung into a rock and took 5 damage.
Stepped on a Grimy Trap. A Chesto Berry went bad and was tossed out.
The fights:
Spoiler:
Varoom, level 25:
Varoom, level 24:
Text in case the images are hard to read:
Spoiler:
---Varoom, level 25---
Simisear enters the fight at 70/70 HP.
Simisear outspeeds.
Abra Storage (Item Storage for full inventory sections):
Spoiler:
Quests:
Spoiler:
Main Quest:
-Escape the Dungeon.
Side Quests:
-Halted Negotiations
Objective: Find the third Smoliv running an errand to the Construction Company.
Reward: 2 Blue Shards, a Sitrus Berry and a Lob Orb. + 40 Faction Reputation for Arboliva's Living Needs and Exp based on the lead's level when turning in the quest.
Optional Path: Help Smoliv confront the Scovillain Society and retrieve the stolen shipment.
Optional Path Reward: Trailblaze TM, 2 Yellow Shards and 2 Blue shards and Smoliv becomes recruitable if we complete the optional path before reporting in to his brother.
-The Lost Shipment
Objective: Find out if the food shipment was really stolen or not and retrieve it if so.
Reward: Dig TM and a Brushoff Orb. + 25 Team Reputation and Exp based on the lead's level when turning in the quest.
Faction Quests:
-
Completed Quests:
Spoiler:
1) The Lost Hairpin (Side Quest)
Objective: Find Chikorita's hairpin. It's somewhere along the route she described.
Reward: 3 Green Shards, 2 Yellow Shards and a Blowback Orb. + 20 Team Reputation and Exp based on the lead's level when turning in the quest.
2) Left Behind (Side Quest)
Objective: Escort Smoliv back to the merchant stand.
Reward: 2 Yellow Shards, 2 Green Shards, 1 Blue Shard & 1 Trapbust Orb + 30 Faction Reputation for Arboliva's Living Needs and Exp based on the lead's level when turning in the quest.
3) Merchant Guard Recruitment
Objective: Seek out any of the three candidates mentioned by Torterra and get them to hear you out.
Reward: 1 Blue Shard + 2 Yellow Shards + 1 Carbos, 1 Calcium & 1 Protein. + 50 Team Reputation and Exp based on the lead's level when turning in the quest.
Bonus Objective Completed: Get all of the candidates to hear you out before making a decision on which guard to send to Torterra.
Additional Reward Unlocked: 1 Carbos, 1 Calcium & 1 Protein + 1 See-Trap Orb
Failed or Refused Quests:
-Spider Trouble (Refused)
Objective: Defeat a group of Spinarak led by an Ariados for Chespin.
Reputation:
Spoiler:
Team Roundabout's Reputation:
180 Rep
Spoiler:
+30 Team Reputation for helping Roserade save her Budew from the Grimer. (Act 1 - Chapter 12 )
+20 Team Reputation for helping Breloom find his Shroomish. (Act 1 - Chapter 17)
+20 Team Reputation for completing the 'The Lost Hairpin' Side Quest (Act 1 - Chapter 19)
+15 Team Reputation for helping Lilligant deal with the Squawkabilly (Act 1 - Chapter 24)
+50 Team Reputation for completing the Merchant Guard Recruitment quest (Act 1 - Chapter 30)
+30 Team Reputation for defeating all the Pumpkaboo and helping Phantump escape (Act 1 - Chapter 38)
+15 Team Reputation for helping the Milcery out. (Act 1 - Chapter 40)
Faction Reputation:
-Arboliva's Living Needs:
50 Rep - Merchant trade inventory has expanded!
Spoiler:
+20 Faction Reputation for helping the Smoliv beat the Capsakid in a fight. (Act 1 - Chapter 2)
+30 Faction Reputation for completing the 'Left Behind' Side Quest (Act 1 - Chapter 19)
-Scovillain Society:
0 Rep
Spoiler:
No Faction Reputation earned.
Dungeon Map:
Spoiler:
The green dot is where we are currently. Cyan dots are items we didn't pick up. Red dots are optional enemies we didn't fight.
The Green X marks the location of the construction company where the third Smoliv is supposed to be.
The Cyan X marks the location of the Scovillain Society's camp.
The room to our North and West still has the Togedemaru we skipped fighting in an earlier room.
1-1) We've recruited Milcery. Milcery's stats are according to a neutral nature, pending what nature we vote for it. Which of the following natures does our newly recruited Milcery have?
A) Sassy (+Sp. Defense, -Speed)
B) Modest (+Sp. Attack, -Attack)
C) Quiet (+Sp. Attack, -Speed)
D) Naughty (+Attack, -Sp. Defense)
Somehow rolled Modest 3 times in a row for this... I guess RNG really wanted to put Modest in there huh? lol
1-2) We've recruited Hawlucha. Hawlucha's stats are according to a neutral nature, pending what nature we vote for it. Which of the following natures does our newly recruited Hawlucha have?
A) Bashful (Neutral nature)
B) Naughty (+Attack, -Sp. Defense)
C) Careful (+Sp. Defense, -Sp. Attack)
D) Jolly (+Speed, -Sp. Attack)
2) Hawlucha is holding a Black Belt. Have Hawlucha hold a different item?
A) Yes, have Hawlucha hold the Charcoal.
B) Yes, have Hawlucha hold an Oran Berry.
C) Yes, have Hawlucha hold a Sitrus Berry.
D) Yes, have Hawlucha hold a Lum Berry.
E) Yes, have Hawlucha hold a Berry Juice.
F) No, don't swap Hawlucha's item now.
3-1) Hawlucha can learn Acrobatics via TM. Teach Hawlucha Acrobatics?
A) Yes, forget Aerial Ace.
B) Yes, forget Encore.
C) Yes, forget Feather Dance.
D) Yes, forget Brick Break.
E) No, don't learn Acrobatics.
3-2) Hawlucha can learn Drain Punch via TM. Teach Hawlucha Drain Punch?
A) Yes, forget Aerial Ace.
B) Yes, forget Encore.
C) Yes, forget Feather Dance.
D) Yes, forget Brick Break.
E) No, don't learn Drain Punch.
In case of a conflict between 3-1) & 3-2), the result of 3-1) will be prioritized.
4) Simisear is in the lead. Do we want to swap our lead for this room?
A) No, keep Simisear in the lead.
B) Yes, switch to Pansage.
C) Yes, switch to Simipour.
D) Yes, switch to Alolan Persian.
E) Yes, switch to Squawkabilly.
F) Yes, switch to Hawlucha.
5) We can turn in the 'The Lost Shipment' quest to Gurdurr. Once this quest has been completed, Gurdurr and the Machoke will move out of the way, which will grant us access to the services of Mienshao and Diggersby and let us reach the Machoke who has a quest for us in the back. Do we turn in the quest?
A) Yes, turn in the quest.
B) No, don't turn in the quest now.
The results of Questions 6-1), 6-2), 6-3) & 7-1), 7-2), 7-3) & 8-1), 8-2) below will be ignored if we do not turn in the quest, as Gurdurr won't let us past in that case.
Mainly trying to streamline this room a bit and not have us just talk to Gurdurr and be forced to come back later for anything else.
Mienshao's shop and service:
Spoiler:
Mienshao's inventory will expand as we make our way through the dungeon and increase our Team Reputation.
I was gonna do Exp. Candy S and M initially, skipping XS... but then I looked up how much experience M grants... it's too early for that one. Also tried to make the prices affordable, but without being too cheap. Not sure if I pulled that off, but we'll see I guess.
6-1) Do we buy any Exp. Candy XS?
A) Yes, buy 1.
B) Yes, buy 2.
C) Yes, buy 3.
D) Yes, buy 4.
E) Yes, buy 5.
F) Yes, buy 6.
G) Yes, buy 7.
H) Yes, buy 8.
I) Yes, buy 9.
J) Yes, buy 10.
K) No, don't buy any.
6-2) Do we buy any Exp. Candy S?
A) Yes, buy 1.
B) Yes, buy 2.
C) Yes, buy 3.
D) Yes, buy 4.
E) Yes, buy 5.
F) Yes, buy 6.
G) No, don't buy any.
6-3) We have a treasure chest. Pay Mienshao 2 of each type of shard to open it?
A) Yes, pay the fee to have Mienshao open the treasure chest.
B) No, don't try to open the treasure chest now.
Diggersby's shop and service:
Spoiler:
Just like with Mienshao, Diggersby's inventory will expand as we make our way through the dungeon and increase our Team Reputation.
7-1) Do we buy any Calcium?
A) Yes, buy 1.
B) Yes, buy 2.
C) Yes, buy 3.
D) Yes, buy 4.
E) Yes, buy 5.
F) Yes, buy 6.
G) Yes, buy 7.
H) Yes, buy 8.
I) Yes, buy 9.
J) Yes, buy 10.
K) No, don't buy any.
7-2) Do we buy any Carbos?
A) Yes, buy 1.
B) Yes, buy 2.
C) Yes, buy 3.
D) Yes, buy 4.
E) Yes, buy 5.
F) Yes, buy 6.
G) Yes, buy 7.
H) Yes, buy 8.
I) Yes, buy 9.
J) Yes, buy 10.
K) No, don't buy any.
7-3) Do we buy any HP Up?
A) Yes, buy 1.
B) Yes, buy 2.
C) Yes, buy 3.
D) Yes, buy 4.
E) Yes, buy 5.
F) Yes, buy 6.
G) Yes, buy 7.
H) Yes, buy 8.
I) Yes, buy 9.
J) Yes, buy 10.
K) No, don't buy any.
In case of conflicting purchase vote results, the Treasure Chest in 6-3) will be prioritized first, then 6-1), then 6-2) & 6-3), then 7-1), 7-2) & 7-3).
Any surplus items that don't fit in our inventory will be sent to Abra Storage automatically.
8-1) Diggersby offers multiple services aside from his Vitamin shop. Talk to Diggersby for more information about the services he offers?
A) Yes, talk to Diggersby about all of his services.
B) Yes, talk to Diggersby about digging a hole.
C) Yes, talk to Diggersby about breaking open a wall.
D) Yes, talk to Diggersby about expanding the hideout (it's greyed out as we can't actually purchase this service just yet, but we can ask him about it).
E) No, don't talk to Diggersby outside of any potential Vitamin purchases.
8-2) The Machoke on the other end of the room has a quest for us. This quest involves escorting the Machoke to multiple locations in Act 1, while it carries the crate behind it, to deliver the items within to certain Pokemon. Do we talk to the Machoke and accept it's quest?
A) Yes, talk to Machoke and accept it's quest.
B) Talk to Machoke and refuse it's quest.
C) Don't talk to Machoke and leave the quest for later.
9) Which room do we go to next?
A) Go to room 1 from it's right Southern entry.
B) Go to room 1 from it's left Southern entry.
C) Go to room 2 from it's Southern entry.
D) Go to room 2 from it's Eastern entry.
E) Go to room 4 from it's upper Western entry.
F) Go to room 4 from it's Northern entry.
G) Go to room 4 from it's lower Western entry.
H) Go to room 3 from it's Western entry. (we'll have to fight the Nymble on the way).
I) Go to room 3 from its left Southern entry.
J) Go to room 3 from it's right Southern entry.
K) Go to room 6 from it's Western entry.
L) Go to room 6 from it's Eastern entry.
M) Go to room 6 from it's Southern entry.
N) Go to the Large Forest room to fight the remaining enemies and pick up the remaining items.
O) Go to room 8.
P) Go to room 7 from the Western entrance.
Q) Go to room 7 from the Northern entrance.
R) Go to room 9.
S) Go to room 10 from the Eastern entrance.
T) Go to room 10 from the Southern entrance.
U) Go to room 11 from the Northern entrance.
V) Go to room 11 from the Eastern entrance.
W) Go to room 11 from the Southern entrance.
X) Go to room 13.
Y) Go to the Move Releaner/Egg Move Tutor in the tree stump room.
Z) Go to the Merchant Stand.
Wanted to offer some free backtracking as well, but it's already a pretty busy week with a lot of votes... I'll try again next week I guess.
1-1) B) Modest (+Sp. Attack, -Attack) Plenty of solid choices, but Modest for sure.
1-2) C) Careful (+Sp. Defense, -Sp. Attack) Already outspeeds everyone else. Would rather shore up a weakness.
2) B) Yes, have Hawlucha hold an Oran Berry. Not opposed to the Lum Berry either.
3-1) B) Yes, forget Encore. Considered keeping Feather Dance over Acrobatics for some big boss. Works really well with berries, though.
3-2) C) Yes, forget Feather Dance. So good.
4) F) Yes, switch to Hawlucha. Highest level on the team.
5) A) Yes, turn in the quest.
6-1) K) No, don't buy any. Passes on all the candy. Reasoning:
Checked Litleo's experience curve (Medium Slow). Takes 10208 total experience to be at level 24 and 11735 for level 25. 11735 - 10208 = 1527 experience for a single level-up. Equals about 2 EXP Candy S or 15 EXP Candy XS. Equals roughly 30 Yellow Shards OR 8 Yellow + 8 Green Shards.
Zipped back to Chapter 30 (on page 6 of the thread) to look at the shop. Buys an Oran Berry for 2 Green. Spots See-Trap Orbs for 3 Yellow and Slumber Orbs for 4 Yellow. Values those more than the candy.
Questions the value of experience as well. Catches up Pokemon who are behind, sure. Might also scale the wild Pokemon up in level too. (Does not know the precise mechanic here, admittedly.) May result in little real benefit.
6-2) G) No, don't buy any.
6-3) A) Yes, pay the fee to have Mienshao open the treasure chest. Wants to know what is in the mystery box.
7-1) K) No, don't buy any. Yields an average of less than one stat point per vitamin. (Reference: Gains 16 hitpoints for 24 HP Ups on Hawlucha.) Would not even pay one Red Shard for these. Does not hold a candle to the power of an evolution stone. Begins thinking about it at one shard per vitamin.
7-2) K) No, don't buy any.
7-3) K) No, don't buy any.
8-1) A) Yes, talk to Diggersby about all of his services. Why not?
8-2) A) Yes, talk to Machoke and accept it's quest. Provides some direction, so sure.
9) X) Go to room 13. Looks like an easy win for Hawlucha.